Most web applications need to persist data in one form or other. When working with a server-side language, this is normally a straightforward task. However when you add a front-end JavaScript framework to the mix, things start to get a bit trickier.
In this tutorial I am going to demonstrate how to build a JSON API using Ruby on Rails and then code a fully-functional React frontend to interact with the API. The app we’ll be building is an event manager, which will let you create and manage a list of academic events.
The app will showcase basic CRUD functionality and will add a couple of extra features, such as a datepicker and search.
This is what the finished product will look like.
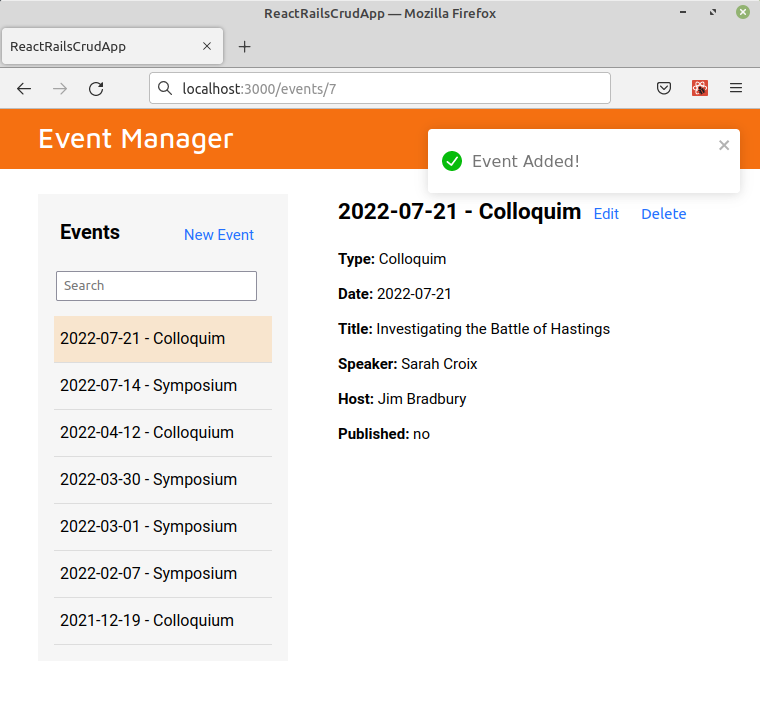 You can find the complete code for the tutorial on GitHub.
This post is also available in Japanese.
Prerequisites
To follow along, you’ll need both Ruby and Node installed on your system. For Ruby you can either go here and download the official binaries for your system, or use a version manager such as rbenv.
The same goes for Node. You can either go here and download the official binaries for your system, or use a version manager such as nvm.
In both cases I would encourage people to use a version manager. They are easy to set up and make managing multiple versions of Node/Ruby a breeze. They also help negate permissions problems, meaning you don’t end up having to install gems/packages with admin rights.
For this tutorial I’ll be using Ruby version 3.1 and Node version 16 (the latest LTS). My operating system is Linux Mint, so any terminal related commands will be tailored towards ‘nix.
Tech Stack
When building an app like this, there are many ways to accomplish the same goal. This section gives you an overview of the libraries I have used and the tech choices I have made.
I am using the following libraries:
- Rails version 7
- React version 18
- React Router version 6
- Pikaday
- React-Toastify
- React Prop Types
- ESLint
I have used SQLite as a database, as this requires least setup and is what Rails uses as a default for a new app.
I am using esbuild to bundle the React app, although I will also show how to set up Shakapacker, the successor to Webpacker.
To reflect current trends in the React community, this tutorial will use hooks and function components, not class-based components. If you would like to read an earlier version of this tutorial which uses class-based components, you can find that here.
Otherwise, I have tried to keep packages and dependencies to a minimum. For example, I have used npm as a package manager (as opposed to installing Yarn) and am making any Ajax requests using the Fetch API, as opposed to using a package such as Axios.
Finally, it is worth mentioning that the React app will live within the app/javascript folder of the Rails app. It would be possible to make the Rails app and the React app separate projects, but for an app of this size, I prefer to keep one within the other.
Choosing a Bundler
Before we issue the command to create a new Rails application, we have to decide how we are going to configure Rails to deal with our JavaScript.
There has been a lot happening in this space recently and one exciting new development is import maps. This is the default in Rails 7.
As the name suggests, this feature lets you import JavaScript modules directly from a CDN (for example) and map these imports to versioned/digested files. This in turn enables you to build JavaScript applications without the need for a transpilation or bundling step.
Unfortunately, when building a React app, this approach isn’t perfect, as you will need to compile the JSX. This is where JavaScript Bundling for Rails comes in. This is a gem that allows you to use either esbuild, rollup.js, or webpack to bundle your JavaScript, then deliver it via the asset pipeline. Of these three bundling options, the Rails community seems most enthusiastic about esbuild, so that is what I will be going with here.
I will however, also demonstrate how to set things up with Shakapacker. This is the successor to the now retired Webpacker gem. It provides a wrapper around the webpack build system, a standard webpack configuration and a reasonable set of defaults.
There are a couple of differences between the two solutions. esbuild is considerably more lightweight, but not as fully featured as Shakapacker. For example it offers no hot module replacement and code splitting is still a work in progress. Transforming ES6+ syntax to ES5 is not supported in esbuild, whereas with Shakapacker (which uses Babel), it is.
If you would like to read more about what JavaScript in Rails currently looks like, check out the following videos and blog post, all by by DHH (the creator of Rails):
- Modern web apps without JavaScript bundling or transpiling
- Alpha preview: Modern JavaScript in Rails 7 without Webpack
- Alpha preview: Using React with importmaps on Rails 7
- Alpha preview: Converting a import-mapped React app to use esbuild with JSX in Rails 7
Creating a New Rails App
First, let’s install Rails and check the version number:
gem install rails
rails -v
=> 7.0.2.3
Then, choose a bundler (esbuild or Shakapacker) and follow the instructions below.
esbuild
Follow this section if you want a lightweight bundling solution, with no hot module replacement and no transformation of ES6+ syntax.
Create a new Rails project like so:
rails new event-manager -j esbuild
Once the installer has run, change into the app directory and install React.
cd event-manager
npm i react react-dom
If you open the package.json file in the project’s root, you’ll see that there is an npm script to build the app. Let’s add a second one to watch the app/javascript directory for changes and to rebundle everything when any are detected.
"scripts": {
  "build": "esbuild app/javascript/*.* --bundle --sourcemap --outdir=app/assets/builds --loader:.js=jsx",
  "watch": "esbuild app/javascript/*.* --watch --bundle --outdir=app/assets/builds --loader:.js=jsx"
}
Notice that we have used --loader:.js=jsx to tell esbuild to allow JSX syntax in .js files. The alternative here is to give your JSX files a .jsx extension.
Finally edit the Procfile.dev file in the project root:
web: bin/rails server -p 3000
js: npm run watch
Skip the next section and proceed to Creating a Hello World React App.
Shakapacker
Follow this section if you want a fully featured bundler, with hot module replacement and transformation of ES6+ syntax via Babel.
Create a new Rails project like so:
rails new event-manager --skip-javascript
Change into the newly created directory and add Shakapacker to your Gemfile:
bundle add shakapacker --strict
Like Webpacker, Shakapacker relies on yarn, so make sure you have that available:
npm i -g yarn
Then run the following commands:
./bin/bundle install
./bin/rails webpacker:install
yarn add react react-dom @babel/preset-react
Note: there is a bug in the latest version of Shakapacker which results in it not being able to find the Webpacker configuration file when you run
rails webpacker:install. If you encounter this, you can pin Shakapacker to its previous version like so:bundle add shakapacker --version "6.2.1" --strict.
Update package.json to add the @babel/preset-react:
"babel": {
  "presets": [
    "./node_modules/shakapacker/package/babel/preset.js",
    "@babel/preset-react"
  ]
},
Creating a Hello World React App
Generate a site controller with an index action. This is where the React app will be served from:
rails g controller site index
Replace the contents of app/views/site/index.html.erb with the following:
<div id="root"></div>
Next, create an App component for our React application inside of a components folder in the app/javascript directory:
mkdir app/javascript/components
touch app/javascript/components/App.js
Add the following code to app/javascript/application.js:
import React from 'react';
import { createRoot } from 'react-dom/client';
import HelloMessage from './components/App';

const container = document.getElementById('root');
const root = createRoot(container);

document.addEventListener('DOMContentLoaded', () => {
  root.render(<HelloMessage name="World" />);
});
This imports a HelloMessage component and renders it in the div element we created above.
Add the following code to app/javascript/components/App.js:
import React from 'react';
const HelloMessage = ({ name }) => <h1>Hello, {name}!</h1>;
export default HelloMessage;
Finally, add a root route to the config/routes.rb file:
Rails.application.routes.draw do
  root to: 'site#index'
end
If you are using esbuild, run: ./bin/dev from the project route.
If you are using Shakapacker, kick off the Rails server in one terminal and the webpack dev server in another:
rails s
./bin/webpacker-dev-server
Then hit http://localhost:3000/. You should see our React app displaying a “Hello, World!” message. 🎉
Troubleshooting SQLite
Depending on your operating system, you may need to install some additional libraries for Rails to interface with SQLite correctly.
On macOS, it seems that SQLite is preinstalled, so no action is necessary.
On Linux you may need to install the SQLite 3 development files:
sudo apt-get install libsqlite3-dev
On Windows you will likely need the SQLite binaries in your path, as suggested in this Stack Overflow answer.
If you run into any difficulties, try searching for the error message.
Hot Module Replacement
As far as following along with this tutorial is concerned, the main difference between the two bundlers is what happens when you make changes to your project files.
In the case of esbuild, it will rebundle everything, but in order to see the changes you need to refresh the browser manually. It doesn’t seem like esbuild has any plans to support HMR, but it does (kinda) work with live reloading. If you’re interested in that, check out Live reloading with Ruby on Rails and esbuild.
Shakapacker on the other hand, comes with live reloading (i.e. an automatic page refresh) out of the box. It can also do Hot Module Replacement (HMR) whereby it automatically updates only that part of the page that changed while preserving your app’s state. This is definitely very convenient, but comes at the cost of a whole bunch of dependencies.
Before deciding on which bundler to use, take a second to weigh up your choices and decide which approach is best for you and the app that you are building.
Enable HMR for Shakapacker
To enable HMR for a React app when using Shakapacker, a little extra configuration is needed. If you are using esbuild, you can skip this section and go on to Building the API.
First off, hop into config/webpacker.yml set hmr is set to true.
Then alter config/webpack/webpack.config.js like so:
const { webpackConfig, inliningCss } = require('shakapacker');
const ReactRefreshWebpackPlugin = require('@pmmmwh/react-refresh-webpack-plugin');
const isDevelopment = process.env.NODE_ENV !== 'production';

if (isDevelopment && inliningCss) {
  webpackConfig.plugins.push(
    new ReactRefreshWebpackPlugin({
      overlay: {
        sockPort: webpackConfig.devServer.port,
      },
    })
  );
}

module.exports = webpackConfig;
Install the react-refresh package, as well as @pmmmwh/react-refresh-webpack-plugin:
yarn add --dev react-refresh @pmmmwh/react-refresh-webpack-plugin
Finally, delete the Babel configuration from package.json:
- "babel": {
-   "presets": [
-     "./node_modules/shakapacker/package/babel/preset.js",
-     "@babel/preset-react"
-   ]
- },
Then create a babel.config.js file in the root of project and add the following:
module.exports = function (api) {
  const defaultConfigFunc = require('shakapacker/package/babel/preset.js')
  const resultConfig = defaultConfigFunc(api)
  const isDevelopmentEnv = api.env('development')
  const isProductionEnv = api.env('production')
  const isTestEnv = api.env('test')

  const changesOnDefault = {
    presets: [
      [
        '@babel/preset-react',
        {
          development: isDevelopmentEnv || isTestEnv,
          useBuiltIns: true
        }
      ]
    ].filter(Boolean),
    plugins: [
      isProductionEnv && ['babel-plugin-transform-react-remove-prop-types',
        {
          removeImport: true
        }
      ],
      process.env.WEBPACK_SERVE && 'react-refresh/babel'
    ].filter(Boolean),
  }

  resultConfig.presets = [...resultConfig.presets, ...changesOnDefault.presets]
  resultConfig.plugins = [...resultConfig.plugins, ...changesOnDefault.plugins ]

  return resultConfig
}
Restart the server, refresh the browser, and with that, HMR for your React app is enabled. 🚀
Building the API
Let’s start off by generating an Event model:
rails g model Event \
event_type:string \
event_date:date \
title:text \
speaker:string \
host:string \
published:boolean
Migrate the database:
rake db:migrate
Next, seed the model with some test data. You can do this by creating a db/seeds/events.json file and adding the contents from the corresponding file in the project repo.
Then in db/seeds.rb, add:
json = ActiveSupport::JSON.decode(File.read('db/seeds/events.json'))
json.each do |record|
  Event.create!(record)
end
And run rake db:seed. Start up the rails console with rails c and confirm that you have some data:
rails c
Loading development environment (Rails 7.0.2.3)
irb(main):001:0> Event.all.count
   (1.7ms)  SELECT sqlite_version(*)
  Event Count (0.2ms)  SELECT COUNT(*) FROM "events"
=> 6
Controllers
In the next step, we’ll create an Events controller to respond to incoming requests to our API. We’ll put the controller in its own folder, as we’re going to namespace it. This will keep our code nice and organized and allow us to create our own set of routes for the API.
mkdir app/controllers/api
touch app/controllers/api/events_controller.rb
Add the following code to app/controllers/api/events_controller.rb:
class Api::EventsController < ApplicationController
  before_action :set_event, only: %i[show update destroy]

  def index
    @events = Event.all
    render json: @events
  end

  def show
    render json: @event
  end

  def create
    @event = Event.new(event_params)

    if @event.save
      render json: @event, status: :created
    else
      render json: @event.errors, status: :unprocessable_entity
    end
  end

  def update
    if @event.update(event_params)
      render json: @event, status: :ok
    else
      render json: @event.errors, status: :unprocessable_entity
    end
  end

  def destroy
    @event.destroy
  end

  private

  def set_event
    @event = Event.find(params[:id])
  end

  def event_params
    params.require(:event).permit(
      :id,
      :event_type,
      :event_date,
      :title,
      :speaker,
      :host,
      :published,
      :created_at,
      :updated_at
    )
  end
end
This is a basic set of controller methods to make up the CRUD functionality of our API. Hopefully the code is easy enough to follow, as I don’t want to go into it in much depth here. If you are new to Rails and would like to find out more about API building, check out How to Create a Rails Backend API.
The final thing we need to do regarding controllers is to change the forgery protection method in app/controllers/application_controller.rb:
class ApplicationController < ActionController::Base
  protect_from_forgery with: :null_session
end
The reason this is necessary is that Rails has a built in mechanism to protect against cross site request forgery (CSRF) attacks. By default this sees Rails generate a unique token and validate its authenticity with each POST PUT PATCH DELETE request. If the token is missing, Rails will throw an exception.
However, as we are building a single-page app, we will only have a fresh token upon first render, which means we will need to alter this behavior. The above code ensures that if no CSRF token is provided, Rails will respond with an empty session, which will prevent any other scripts from using our authenticated session to do bad things
If you’d like to read more about this, check out:
- Understanding Rails’ Forgery Protection Strategies
- A Deep Dive into CSRF Protection in Rails
- Rails CSRF protection for SPA
- Configuring Rails as a JSON API
Routes
Finally let’s fix up the routes in config/routes.rb. The routing for the controller has to consider the fact that it’s within the Api namespace. We’ll do this using the namespace method.
Rails.application.routes.draw do
  root to: 'site#index'

  namespace :api do
    resources :events, only: %i[index show create destroy update]
  end
end
At this point if you can hit the various endpoints ( e.g. http://localhost:3000/api/events) and interact with the API.
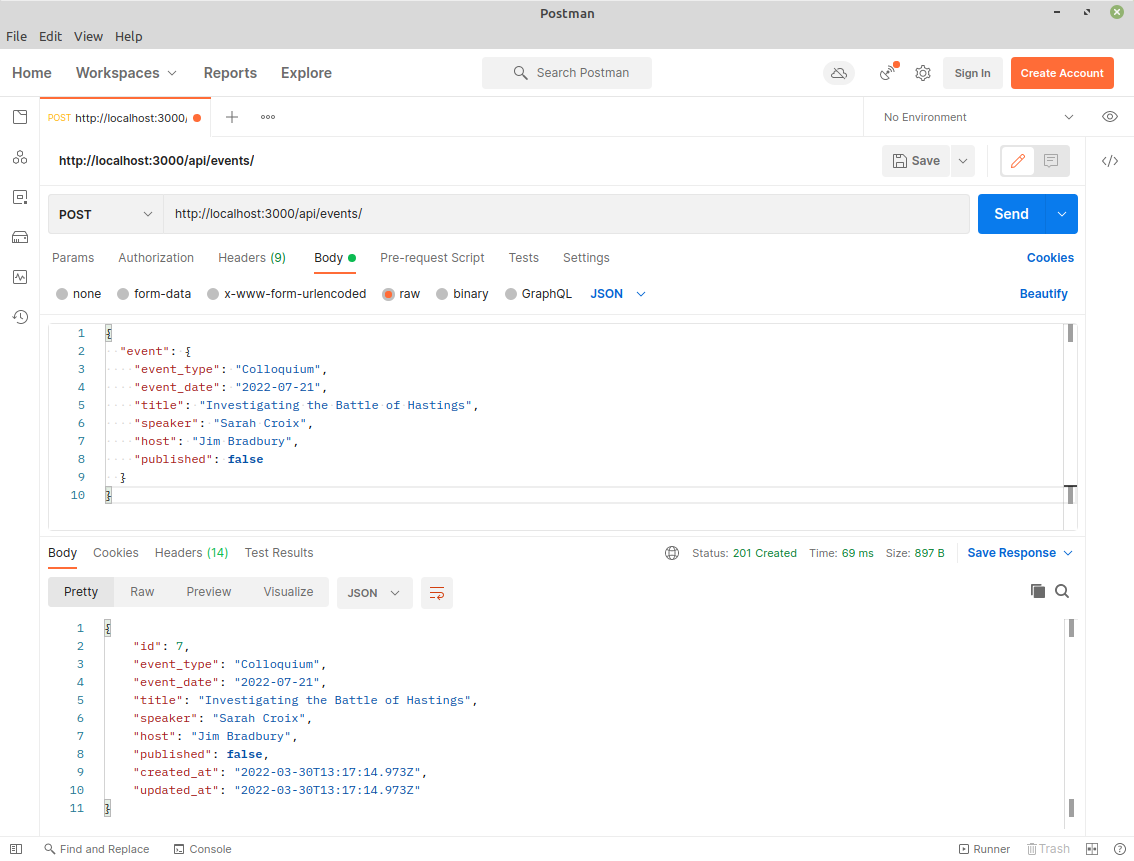
You might also like to test the API with Postman. Here’s how you would create a new event.
Set the request type to POST, the URL to http://localhost:3000/api/events, the Headers to Content-Type: application/json and under Body > raw enter:
{
  "event": {
    "event_type": "Colloquium",
    "event_date": "2022-07-21",
    "title": "Investigating the Battle of Hastings",
    "speaker": "Sarah Croix",
    "host": "Jim Bradbury",
    "published": false
  }
}
Then hit send and you should see a response similar to that below.
 You could also accomplish the same thing using curl:
curl --location --request POST 'http://localhost:3000/api/events' \
--header 'Content-Type: application/json' \
--data-raw '{
  "event": {
    "event_type": "Colloquium",
    "event_date": "2022-07-21",
    "title": "Investigating the Battle of Hastings",
    "speaker": "Sarah Croix",
    "host": "Jim Bradbury",
    "published": false
  }
}'
Before moving on, check either the Rails console or http://localhost:3000/api/events to satisfy yourself that the event has been created.
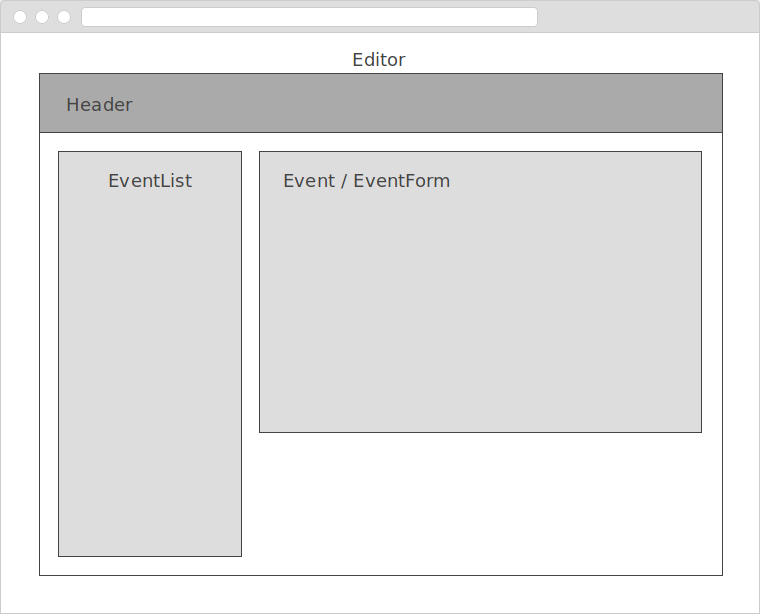
Scaffolding the Event Manager
Next we need to think about how to structure our app’s UI. We’ll start off with an <Editor> component which will contain the following child components:
- A
<Header>component to display our app’s title - An
<EventList>component to display a list of events - An
<Event>component to display individual events - An
<EventForm>component to allow us to edit and create events
The whole thing will look like this:
Fetching Events
Let’s start off by creating the files we will need in this section:
touch app/javascript/components/{Editor.js,Header.js,EventList.js}
Please note that from now on I won’t give the full path of the React components. They are all located in
app/javascript/components
Next, install React’s prop-types package. This package will allow us to to document the intended types of component properties and also to make sure any values passed are of the correct data type.
npm i prop-types
If you are using Shakapacker, remember to use Yarn to install your dependencies. In this case, the command would be
yarn add prop-types.
Alter app/javascript/application.js thus:
import React, { StrictMode } from 'react';
import { createRoot } from 'react-dom/client';
import App from './components/App';

const container = document.getElementById('root');
const root = createRoot(container);

document.addEventListener('DOMContentLoaded', () => {
  root.render(
    <StrictMode>
      <App />
    </StrictMode>
  );
});
When using esbuild, Rails will add imports for “@hotwired/turbo-rails” and “./controllers”. These relate to Turbo and Stimulus, which together form the core of Hotwire. They are not relevant to our React application and I would recommend just leaving them as they are.
You will also notice that we are wrapping the <App> component in a <StrictMode> component. This does not render any visible UI, rather it is a helper component that activates additional checks and warnings for its descendants while in development mode. You can read more about it here.
Data Fetching With React Hooks
Now we can get on to building the React app. Let’s start off in App.js where we will require and render our <Editor> component.
import React from 'react';
import Editor from './Editor';

const App = () => <Editor />;

export default App;
Next, add the following code to Editor.js:
import React, { useState, useEffect } from 'react';
import Header from './Header';
import EventList from './EventList';

const Editor = () => {
  const [events, setEvents] = useState([]);
  const [isLoading, setIsLoading] = useState(true);
  const [isError, setIsError] = useState(false);

  useEffect(() => {
    const fetchData = async () => {
      try {
        const response = await window.fetch('/api/events');
        if (!response.ok) throw Error(response.statusText);
        const data = await response.json();
        setEvents(data);
      } catch (error) {
        setIsError(true);
        console.error(error);
      }

      setIsLoading(false);
    };

    fetchData();
  }, []);

  return (
    <>
      <Header />
      {isError && <p>Something went wrong. Check the console.</p>}

      {isLoading ? <p>Loading...</p> : <EventList events={events} />}
    </>
  );
};

export default Editor;
There is a bit more going on here, so let’s break it down. Essentially we want to contact our API, grab a list of events and pass them to the <EventList> component, so that it can display them on the page.
We start off by employing the useState hook to declare three variables in state (events, isLoading and isError), as well as functions to set the values of these variables. We also assign them some initial values.
Next comes a useEffect hook to handle our data fetching. As we are passing it an empty array as a second argument, this will run once when the component is rendered. This functions similarly to componentDidMount in a class-based component.
Inside the useEffect hook, we declare a fetchData function, which uses the Fetch API to hit the /api/events endpoint. Assuming this returns a valid JSON response (a list of events), we save that to the events variable in state.
The data fetching happens within a try... catch block, so that we can handle any errors that might occur. Note that the Promise returned from fetch() won’t reject according to HTTP error status, even if the response is 404 or 500. This is why we have to inspect the response’s ok property and catch any errors manually. You can read more about that here: Handling Failed HTTP Responses With fetch().
Once the data fetching has completed, we set the isLoading variable to false.
If you want to check the loading effect, add a
sleep 5to theindexmethod in theEventsController.
The last thing we do inside the hook is to invoke the fetchData function. We need a separate function here, as we cannot mark the callback function we pass to the useEffect hook as being async.
Finally, we return some JSX. This consists of the <Header> component we will declare shortly, then either an error message, a loading message, or the <EventList> component to which we pass a list of events. The <Editor> component works out which of these to render based on the value of the isError and isLoading variables we declared previously.
If you are new to using hooks in React, I suggest checking out this article over on SitePoint to get up to speed. If you would like to dive into data fetching in React using hooks, I recommend this tutorial by Robin Wieruch.
In Header.js:
import React from 'react';

const Header = () => (
  <header>
    <h1>Event Manager</h1>
  </header>
);

export default Header;
Nothing exciting going on here. We’re just rendering a header element.
In EventList.js add the following:
import React from 'react';
import PropTypes from 'prop-types';

const EventList = ({ events }) => {
  const renderEvents = (eventArray) => {
    eventArray.sort((a, b) => new Date(b.event_date) - new Date(a.event_date));

    return eventArray.map((event) => (
      <li key={event.id}>
        {event.event_date}
        {' - '}
        {event.event_type}
      </li>
    ));
  };

  return (
    <section>
      <h2>Events</h2>
      <ul>{renderEvents(events)}</ul>
    </section>
  );
};

EventList.propTypes = {
  events: PropTypes.arrayOf(PropTypes.shape({
    id: PropTypes.number,
    event_type: PropTypes.string,
    event_date: PropTypes.string,
    title: PropTypes.string,
    speaker: PropTypes.string,
    host: PropTypes.string,
    published: PropTypes.bool,
  })).isRequired,
};

export default EventList;
This component receives an array of event objects as props (events) and is responsible for displaying them as an ordered list. This happens in the renderEvents method which sorts the array by date in descending order, then renders a list item for each event.
Note that we have also implemented some prop validation to ensure that the events prop is an array of objects and that each object in that array has a certain set of properties, each of a certain type. We are specifying that the events prop and all of the object properties are required. Consequently, while in development mode, an error will be thrown if anything is missing or of the incorrect type.
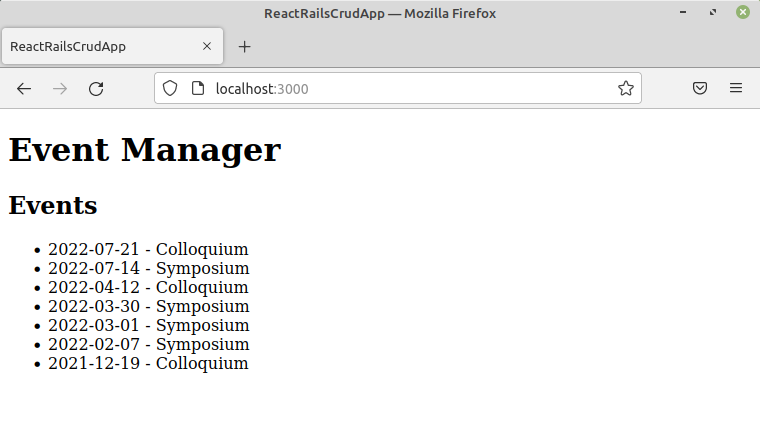
If you now visit http://localhost:3000 you should see a list of events displayed. Exciting, huh?
Adding Some Development Tooling
Now that we’re writing some JavaScript, it’s a good time to install a couple of tools to aid our development process and to ensure the quality of our code.
ESLint
ESLint is a tool for identifying common errors and problematic patterns in JavaScript code. As regards code quality, this is one of the most useful tools in a JavaScript developer’s toolbox. You can install it like so:
npm i -D eslint
Then add the Airbnb config to the project. This provides a set of rules corresponding to the Airbnb JavaScript Style Guide:
npm i -D eslint-config-airbnb
If you are using Yarn, this will be
yarn add --dev eslint eslint-config-airbnb.
Next, find out what the remaining dependencies are:
npm info "eslint-config-airbnb@latest" peerDependencies
Outputs:
{
  eslint: '^7.32.0 || ^8.2.0',
  'eslint-plugin-import': '^2.25.3',
  'eslint-plugin-jsx-a11y': '^6.5.1',
  'eslint-plugin-react': '^7.28.0',
  'eslint-plugin-react-hooks': '^4.3.0'
}
Add the final four packages to the devDependencies section of package.json and run npm i (or yarn install) to pull them in.
"devDependencies": {
  ...
  "eslint-plugin-import": "^2.25.3",
  "eslint-plugin-jsx-a11y": "^6.5.1",
  "eslint-plugin-react": "^7.28.0",
  "eslint-plugin-react-hooks": "^4.3.0"
}
Create an .eslintrc.js file in the project root and add:
module.exports = {
  root: true,
  extends: ['airbnb', 'airbnb/hooks'],
  rules: {
    'react/jsx-filename-extension': [1, { extensions: ['.js', '.jsx'] }],
    'react/function-component-definition': [
      1,
      { namedComponents: 'arrow-function' },
    ],
    'no-console': 0,
    'no-alert': 0,
  },
};
This will tell ESLint to use the Airbnb ruleset we just installed and to enable the linting rules for React hooks . It will also allow files with a js ending to contain JSX, switch off warnings for console and alert statements and allow us to use arrow function syntax for our function components.
If you would prefer to enforce a different function type for function components, you can read about how to configure that rule here.
You can run ESLint from the terminal:
./node_modules/.bin/eslint app/javascript
Or as an npm script:
"scripts": {
  "lint": "eslint app/javascript"
},
But for the best results, you’ll probably want to integrate it into your editor. I’m using Sublime Text 3 with SublimeLinter, SublimeLinter-eslint and SublimeJsPrettier to great effect. I also use eslint-config-prettier, which turns off any linting rules that might conflict with Prettier.
If you’re more of a VS Code person, you might like this video by Wes Bos: ESLint + Prettier + VS Code — The Perfect Setup.
React Developer Tools
While we are looking at tooling, you might also like to take a minute to check out React’s Developer Tools. These let you inspect the React component hierarchy, including component props and state and are available as a browser extension (for Chrome and Firefox), and as a standalone app.
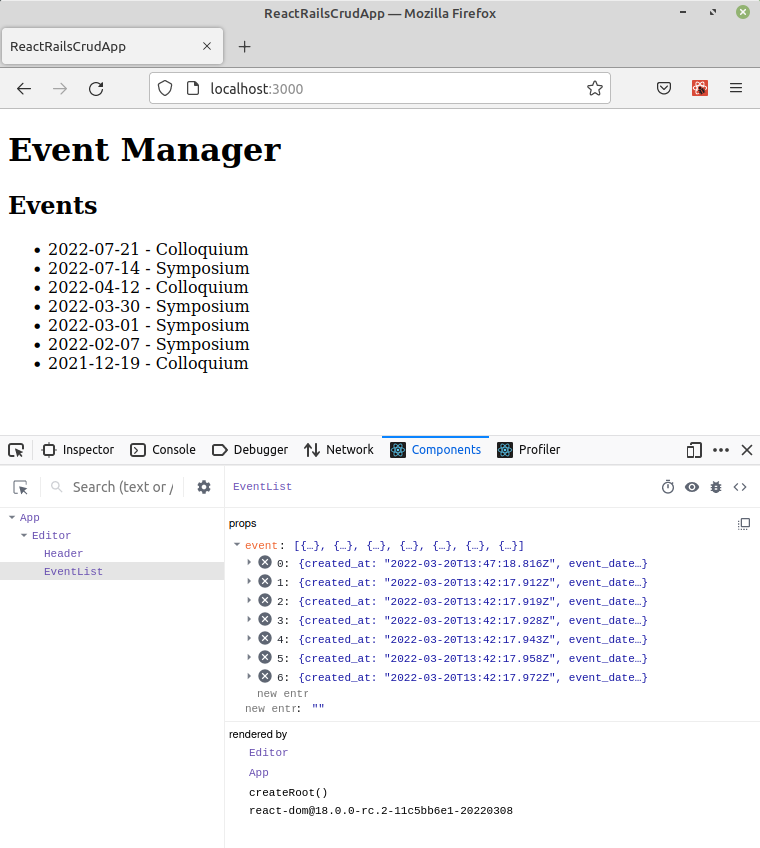 You won’t need the React Developer Tools overly much if you follow along with this tutorial verbatim, but as soon as you start to try things out and deviate from what I am doing, they will be extremely helpful in understanding what is going on under the hood.
Displaying an Event
Next, let’s make the events list clickable, so that when a user selects an event, its details are displayed on the screen. For this we’re going to need React router, which will change the URL to reflect the current event and provide us with an outlet for our event information.
React Router
You can install React Router like so:
npm i react-router-dom@6
Or like so if you are using Yarn:
yarn add react-router-dom@6
As you can see, we are using the latest version of React Router (version 6). You should be aware that this library underwent a major rewrite between versions 5 and 6. If you would like to take a closer look at working with React Router 6, I recommend this tutorial by Robin Wieruch.
To begin, let’s sort out the routes in config/routes.rb:
Rails.application.routes.draw do
  root to: redirect('/events')

  get 'events', to: 'site#index'
  get 'events/new', to: 'site#index'
  get 'events/:id', to: 'site#index'
  get 'events/:id/edit', to: 'site#index'

  namespace :api do
    resources :events, only: %i[index show create destroy update]
  end
end
In the first line we’re pointing our root route to http://localhost:3000/events, this is purely for aesthetic reasons. However in the four lines that follow, you can see that we are informing Rails about the routes we will be using in our React application. This is important, as otherwise if a user requested any of these routes directly (by refreshing the page, for example), Rails would know nothing about them and would respond with a 404. Doing things this way means that Rails can simply serve our React app and let it work out which view to display.
Now let’s add the router to app/javascript/application.js:
import React, { StrictMode } from 'react';
import { createRoot } from 'react-dom/client';
import { BrowserRouter } from 'react-router-dom';
import App from './components/App';

const container = document.getElementById('root');
const root = createRoot(container);

document.addEventListener('DOMContentLoaded', () => {
  root.render(
    <StrictMode>
      <BrowserRouter>
        <App />
      </BrowserRouter>
    </StrictMode>
  );
});
This wraps the app in a <BrowserRouter> component, that uses the HTML5 history API to keep the UI in sync with the URL.
A small change is necessary in App.js:
import React from 'react';
import { Routes, Route } from 'react-router-dom';
import Editor from './Editor';

const App = () => (
  <Routes>
    <Route path="events/*" element={<Editor />} />
  </Routes>
);

export default App;
Instead of rendering our <Editor> component directly, we will now use a <Route> component to render it whenever the browser’s URL begins with events/.
To make the event display in the correct place, we need to use a further route. In the <Editor> component:
...
import { Routes, Route } from 'react-router-dom';
import Event from './Event';

const Editor = () => {
  ...
  return (
    <>
      <Header />
      {isError && <p>Something went wrong. Check the console.</p>}
      {isLoading ? (
        <p>Loading...</p>
      ) : (
        <>
          <EventList events={events} />

          <Routes>
            <Route path=":id" element={<Event events={events} />} />
          </Routes>
        </>
      )}
    </>
  );
};

export default Editor;
As in the <App> component, we are using a <Route> component, whose path we set to :id. This is known as a dynamic segment which will match the ID of the current event.
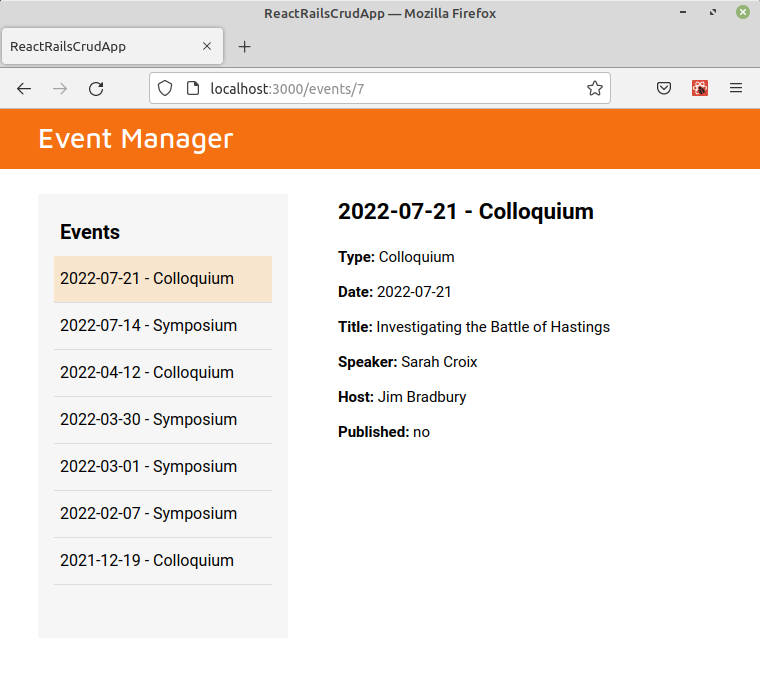
This means that given a URL such as http://localhost:3000/events/7, the following will happen:
application.jswill render our<App>component, wrapped in a<BrowserRouter>- In the
<App>component, the<Route>component will match theevents/part of the URL and render the<Editor>component. - In the
<Editor>component, the<Route>component will match the remainder of the URL (i.e.7) and render the<Event>component, passing it the list of events we fetched previously. - Inside the
<Event>component, the:idsection of the URL will be available to our code.
Take a moment to ensure you understand everything that is going on here, then move on to the next section.
The <Event> Component
Next, we’ll need an <Event> component to display the event.
touch app/javascript/components/Event.js
Then add:
import React from 'react';
import PropTypes from 'prop-types';
import { useParams } from 'react-router-dom';

const Event = ({ events }) => {
  const { id } = useParams();
  const event = events.find((e) => e.id === Number(id));

  return (
    <>
      <h2>
        {event.event_date}
        {' - '}
        {event.event_type}
      </h2>
      <ul>
        <li>
          <strong>Type:</strong> {event.event_type}
        </li>
        <li>
          <strong>Date:</strong> {event.event_date}
        </li>
        <li>
          <strong>Title:</strong> {event.title}
        </li>
        <li>
          <strong>Speaker:</strong> {event.speaker}
        </li>
        <li>
          <strong>Host:</strong> {event.host}
        </li>
        <li>
          <strong>Published:</strong> {event.published ? 'yes' : 'no'}
        </li>
      </ul>
    </>
  );
};

Event.propTypes = {
  events: PropTypes.arrayOf(
    PropTypes.shape({
      id: PropTypes.number.isRequired,
      event_type: PropTypes.string.isRequired,
      event_date: PropTypes.string.isRequired,
      title: PropTypes.string.isRequired,
      speaker: PropTypes.string.isRequired,
      host: PropTypes.string.isRequired,
      published: PropTypes.bool.isRequired,
    })
  ).isRequired,
};

export default Event;
Here we are importing the useParams hook from React Router. This hook gives us access to an object containing the dynamic params from the current URL that were matched by the <Route path> (:id in our case).
We then grab the ID of the current event using destructuring assignment and use that ID to filter the list of events we passed as props, and find the event we want to display.
I would have preferred to only pass the component the event it needs to display (as opposed to all of them), but the way that React Router now works, made this rather tricky. I did also consider sticking all of the events into Context, but that would have increased the complexity of an already long tutorial and would have been overkill in this case. Nonetheless, be aware that this is an option open to you.
The rest of the code is hopefully easy enough to understand, with some JSX being returned and the same prop validation happening as before.
Making Events Clickable
Finally, let’s make the list of events in <EventList> clickable. When clicked, they should navigate to /events/:id.
import { Link } from 'react-router-dom';

...

const renderEvents = (eventArray) => {
  eventArray.sort((a, b) => new Date(b.event_date) - new Date(a.event_date));

  return eventArray.map((event) => (
    <li key={event.id}>
      <Link to={`/events/${event.id}`}>
        {event.event_date}
        {' - '}
        {event.event_type}
      </Link>
    </li>
  ));
};
Here, we are making use of React router’s <Link> component to create the navigation around our application.
And now when you click on a link, the correct event should display.

Adding Some Styling
The app looks pretty ugly right now, so let’s brighten it up a little. Create a file named App.css:
touch app/javascript/components/App.css
And add the following styles:
body, html, div, blockquote, img, label, p, h1, h2, h3, h4, h5, h6, pre, ul, ol, li, dl, dt, dd, form, a, fieldset, input, th, td {
  margin: 0;
  padding: 0;
}

ul, ol {
  list-style: none;
}

body {
  font-family: Roboto;
  font-size: 16px;
  line-height: 28px;
}

header {
  background: #f57011;
  height: 60px;
}

header h1, header h1 a{
  display: inline-block;
  font-family: "Maven Pro";
  font-size: 28px;
  font-weight: 500;
  color: white;
  padding: 14px 5%;
  text-decoration: none;
}

header h1:hover {
  text-decoration: underline;
}

.grid {
  display: grid;
  grid-gap: 50px;
  grid-template-columns: minmax(250px, 20%) auto;
  margin: 25px auto;
  width: 90%;
  height: calc(100vh - 145px);
}

.eventList {
  background: #f6f6f6;
  padding: 16px;
}

.eventList h2 {
  font-size: 20px;
  padding: 8px 6px 10px;
}

.eventContainer {
  font-size: 15px;
  line-height: 35px;
}

.eventContainer h2 {
  margin-bottom: 10px;
}

.eventList li:hover, a.active {
  background: #f8e5ce;
}

.eventList a {
  display: block;
  color: black;
  text-decoration: none;
  border-bottom: 1px solid #dddddd;
  padding: 8px 6px 10px;
  outline: 0;
}

.eventList h2 > a {
  color: #236fff;
  font-size: 15px;
  float: right;
  font-weight: normal;
  border-bottom: none;
  padding: 0px;
}

.eventForm {
  margin-top: 15px;
}

label > strong {
  display: inline-block;
  vertical-align: top;
  text-align: right;
  width: 100px;
  margin-right: 6px;
  font-size: 15px;
}

input, textarea {
  padding: 2px 0 3px 3px;
  width: 400px;
  margin-bottom: 15px;
  box-sizing: border-box;
}

input[type="checkbox"] {
  width: 13px;
}

button[type="submit"] {
  background: #f57011;
  border: none;
  padding: 5px 25px 8px;
  font-weight: 500;
  color: white;
  cursor: pointer;
  margin: 10px 0 0 106px;
}

.errors {
  border: 1px solid red;
  border-radius: 5px;
  margin: 20px 0 35px 0;
  width: 513px;
}

.errors h3 {
  background: red;
  color: white;
  padding: 10px;
  font-size: 15px;
}

.errors ul li {
  list-style-type: none;
  margin: 0;
  padding: 8px 0 8px 10px;
  border-top: solid 1px pink;
  font-size: 12px;
  font-weight: 0.9;
}

button.delete {
  background: none !important;
  border: none;
  padding: 0 !important;
  margin-left: 10px;
  cursor: pointer;
  color: #236fff;
  font-size: 15px;
  font-weight: normal;
  text-decoration: none;
}

button.delete:hover {
  text-decoration: underline;
}

h2 a {
  color: #236fff;
  font-size: 15px;
  font-weight: normal;
  margin: 3px 12px 0 12px;
  text-decoration: none;
}

h2 a:hover {
  text-decoration: underline;
}

.form-actions a {
  color: #236fff;
  font-size: 15px;
  margin: 3px 12px 0 12px;
  text-decoration: none;
}

.form-actions a:hover {
  text-decoration: underline;
}

input.search {
  width: 92%;
  margin: 15px 2px;
  padding: 4px 0 6px 6px;
}

.loading {
  height: calc(100vh - 60px);
  display: grid;
  justify-content: center;
  align-content: center;
}
Please note that these are all of the styles we will need in the app. Listing them all in one go is intended to keep the article a tad shorter.
Here, we’re using a small custom reset and the goodness of CSS grid for our layout. If you’re unfamiliar with CSS grid, there’s a good tutorial here: A Beginners Guide to CSS Grid Layout
Import our styles in App.js:
import './App.css';
Next, alter the markup in the <Editor> component:
return (
  <>
    <Header />
    <div className="grid">
      {isError && <p>Something went wrong. Check the console.</p>}
      {isLoading ? (
        <p className='loading'>Loading...</p>
      ) : (
        <>
          <EventList events={events} />

          <Routes>
            <Route path=":id" element={<Event events={events} />} />
          </Routes>
        </>
      )}
    </div>
  </>
);
The <EventList> component:
return (
  <section className="eventList">
    <h2>Events</h2>
    <ul>{renderEvents(events)}</ul>
  </section>
);
And the <Event> component:
return (
  <div className="eventContainer">
    <h2> ... </h2>
    <ul> ... </ul>
  </div>
);
Open app/views/layouts/application.html.erb and add a couple of custom fonts:
<head>
  <title>EventManager</title>
  <meta name="viewport" content="width=device-width,initial-scale=1">
  <%= csrf_meta_tags %>
  <%= csp_meta_tag %>

  <link rel="preconnect" href="https://fonts.googleapis.com">
  <link rel="preconnect" href="https://fonts.gstatic.com" crossorigin>
  <link href="https://fonts.googleapis.com/css2?family=Maven+Pro:wght@400;500;700&family=Roboto:ital,wght@0,300;0,400;0,700;1,400&display=swap" rel="stylesheet">

  ...
</head>
Bundler Specific Configuration
Depending on the bundler you are using, some extra configuration is necessary.
esbuild
If you are using esbuild, you need to delete app/assets/stylesheets/application.css from the project, as otherwise the next time you start the Rails server you will see the following warning:
ActionView::Template::Error (Multiple files with the same output path cannot be linked (“application.css”)
You could alternatively choose to not create an App.css file and add all of the CSS to app/assets/stylesheets.css for Rails’ asset pipeline to handle. It doesn’t make a big difference in the case of this tutorial, but I for your average React app, it makes more sense for the CSS to live alongside the components it is styling.
Shakapacker
If you are using Shakapacker, you’ll need to install some more packages, so that it can handle CSS files:
yarn add css-loader style-loader mini-css-extract-plugin css-minimizer-webpack-plugin
Then restart the server for good measure.
See the Shakapacker docs for more details: https://github.com/shakacode/shakapacker#css
Either way, now everything should be styled nicely.
Highlighting the Selected Event
Before we move on, let’s make one final tweak and add some styling to the selected event in the list of events. This makes it easier for the user to see which event they are currently viewing at a glance.
All we have to do here is to swap the <Link> component, for a <NavLink> component in the <EventList> component.
import { Link, NavLink } from 'react-router-dom';

const EventList = ({ events }) => {
  const renderEvents = (eventArray) => {
    eventArray.sort((a, b) => new Date(b.event_date) - new Date(a.event_date));

    return eventArray.map((event) => (
      <li key={event.id}>
        <NavLink to={`/events/${event.id}`}>
          {event.event_date}
          {' - '}
          {event.event_type}
        </NavLink>
      </li>
    ));
  };

  ...
};
A <NavLink> is a is a special kind of <Link> that will add an “active” class to the currently active link, which we can now target through our CSS
Creating an Event
So far we have the Read functionality of our CRUD app. Now let’s add the ability to create an event.
Start off in the <Editor> component:
...
import EventForm from './EventForm';

const Editor = () => {
  ...

  return (
    <>
      <Header />
      <div className="grid">
        {isError && <p>Something went wrong. Check the console.</p>}
        {isLoading ? (
          <p>Loading...</p>
        ) : (
          <>
            <EventList events={events} />

            <Routes>
              <Route path="new" element={<EventForm />} />
              <Route path=":id" element={<Event events={events} />} />
            </Routes>
          </>
        )}
      </div>
    </>
  );
}
Here, we’ve added a new <Route> component, whose path property is set to “new”. When this matches the current URL (i.e. /events/new), it will render an <EventForm> component, which will contain our form for adding (and later editing) events.
Next, let’s add a link to display the form in the <EventList> component.
const EventList = ({ events }) => {
  const renderEvents = (eventArray) => { ... };
  ...
  return (
    <section className="eventList">
      <h2>
        Events
        <Link to="/events/new">New Event</Link>
      </h2>
      <ul>{renderEvents(events)}</ul>
    </section>
  );
};
Now, let’s create the <EventForm> component:
touch app/javascript/components/EventForm.js
And add the following content:
import React from 'react';

const EventForm = () => {
  const handleSubmit = (e) => {
    e.preventDefault();
    console.log('Submitted');
  };

  return (
    <section>
      <h2>New Event</h2>
      <form className="eventForm" onSubmit={handleSubmit}>
        <div>
          <label htmlFor="event_type">
            <strong>Type:</strong>
            <input type="text" id="event_type" name="event_type" />
          </label>
        </div>
        <div>
          <label htmlFor="event_date">
            <strong>Date:</strong>
            <input type="text" id="event_date" name="event_date" />
          </label>
        </div>
        <div>
          <label htmlFor="title">
            <strong>Title:</strong>
            <textarea cols="30" rows="10" id="title" name="title" />
          </label>
        </div>
        <div>
          <label htmlFor="speaker">
            <strong>Speakers:</strong>
            <input type="text" id="speaker" name="speaker" />
          </label>
        </div>
        <div>
          <label htmlFor="host">
            <strong>Hosts:</strong>
            <input type="text" id="host" name="host" />
          </label>
        </div>
        <div>
          <label htmlFor="published">
            <strong>Publish:</strong>
            <input type="checkbox" id="published" name="published" />
          </label>
        </div>
        <div className="form-actions">
          <button type="submit">Save</button>
        </div>
      </form>
    </section>
  );
};

export default EventForm;
At this point the form should appear and when you click Save, it should log “Submitted” to the console.

Form Validation
Now, let’s add in some validation to make sure all of the fields (apart from published) are filled out. All of the action will take place in the <EventForm> component.
Change the code in that file, so that it looks like so:
import React, { useState } from 'react';

const EventForm = () => {
  const [event, setEvent] = useState({
    event_type: '',
    event_date: '',
    title: '',
    speaker: '',
    host: '',
    published: false,
  });

  const [formErrors, setFormErrors] = useState({});

  const handleInputChange = (e) => {
    const { target } = e;
    const { name } = target;
    const value = target.type === 'checkbox' ? target.checked : target.value;

    setEvent({ ...event, [name]: value });
  };

  const validateEvent = () => {
    const errors = {};

    if (event.event_type === '') {
      errors.event_type = 'You must enter an event type';
    }

    if (event.event_date === '') {
      errors.event_date = 'You must enter a valid date';
    }

    if (event.title === '') {
      errors.title = 'You must enter a title';
    }

    if (event.speaker === '') {
      errors.speaker = 'You must enter at least one speaker';
    }

    if (event.host === '') {
      errors.host = 'You must enter at least one host';
    }

    return errors;
  };

  const isEmptyObject = (obj) => Object.keys(obj).length === 0;

  const renderErrors = () => {
    if (isEmptyObject(formErrors)) {
      return null;
    }

    return (
      <div className="errors">
        <h3>The following errors prohibited the event from being saved:</h3>
        <ul>
          {Object.values(formErrors).map((formError) => (
            <li key={formError}>{formError}</li>
          ))}
        </ul>
      </div>
    );
  };

  const handleSubmit = (e) => {
    e.preventDefault();
    const errors = validateEvent(event);

    if (!isEmptyObject(errors)) {
      setFormErrors(errors);
    } else {
      console.log(event);
    }
  };

  return (
    <section>
      {renderErrors()}

      <h2>New Event</h2>
      <form className="eventForm" onSubmit={handleSubmit}>
        <div>
          <label htmlFor="event_type">
            <strong>Type:</strong>
            <input
              type="text"
              id="event_type"
              name="event_type"
              onChange={handleInputChange}
            />
          </label>
        </div>
        <div>
          <label htmlFor="event_date">
            <strong>Date:</strong>
            <input
              type="text"
              id="event_date"
              name="event_date"
              onChange={handleInputChange}
            />
          </label>
        </div>
        <div>
          <label htmlFor="title">
            <strong>Title:</strong>
            <textarea
              cols="30"
              rows="10"
              id="title"
              name="title"
              onChange={handleInputChange}
            />
          </label>
        </div>
        <div>
          <label htmlFor="speaker">
            <strong>Speakers:</strong>
            <input
              type="text"
              id="speaker"
              name="speaker"
              onChange={handleInputChange}
            />
          </label>
        </div>
        <div>
          <label htmlFor="host">
            <strong>Hosts:</strong>
            <input
              type="text"
              id="host"
              name="host"
              onChange={handleInputChange}
            />
          </label>
        </div>
        <div>
          <label htmlFor="published">
            <strong>Publish:</strong>
            <input
              type="checkbox"
              id="published"
              name="published"
              onChange={handleInputChange}
            />
          </label>
        </div>
        <div className="form-actions">
          <button type="submit">Save</button>
        </div>
      </form>
    </section>
  );
};

export default EventForm;
We start off by defining two variables in state: event and formErrors. The event variable is initialized as an object with some sensible defaults and formErrors is initialized as an empty object.
Next comes a handleInputChange function. We are going to make all of the fields in our form controlled inputs, which is to say React will responsible for maintaining and setting their state. The handleInputChange function will be called whenever the user changes the values of any of the fields and it will update the event object, so that it mirrors what has been entered into the form. Be aware of the square bracket notation that allows us to use a variable (name) as an object key.
After that we have a couple of helper functions: validateEvent and isEmptyObject. The first of these runs a bunch of checks on the event object and returns an object containing any errors, whereas the second returns true or false depending on whether the object it is passed has any properties or not.
We then have a renderErrors function which returns null if the formErrors object is empty, or otherwise some JSX representing a warning that the form could not be saved, as well as a list of errors.
And finally, we have updated our handleSubmit function to validate the user’s input (and check that each field has a value) and either display an error message if anything is missing, or to log the valid event to the console. We have also updated the JSX slightly and added an onChange property to all our form inputs.
Creating Some Helper Functions
By now our <EventForm> component is growing pretty large and it would be a good idea to split the more generic functions into a file of their own. Initially validateEvent and isEmptyObject are good candidates, as these could conceivably be used elsewhere in the app. This approach will also make the helper functions easier to test, as they are decoupled from React.
Let’s create a new file for these functions:
mkdir app/javascript/helpers
touch app/javascript/helpers/helpers.js
Now add the following code to helpers.js, making sure to remove validateEvent and isEmptyObject from the <EventForm> component:
export const isEmptyObject = obj => Object.keys(obj).length === 0;

export const validateEvent = (event) => {
  const errors = {};

  if (event.event_type === '') {
    errors.event_type = 'You must enter an event type';
  }

  if (event.event_date === '') {
    errors.event_date = 'You must enter a valid date';
  }

  if (event.title === '') {
    errors.title = 'You must enter a title';
  }

  if (event.speaker === '') {
    errors.speaker = 'You must enter at least one speaker';
  }

  if (event.host === '') {
    errors.host = 'You must enter at least one host';
  }

  return errors;
}
And import them into the <EventForm> component like so:
import { isEmptyObject, validateEvent } from '../helpers/helpers';
Now when you attempt to submit a form which is not properly filled out, you should see some nicely formatted errors.

Making the Date Field a Datepicker
The next thing to do is to wire up our date field as a datepicker. For this we’ll use Pikaday.
First, we need to install the library from npm:
npm i pikaday
or
yarn add pikaday
Then in the <EventForm> component, alter the React import, then import Pikaday like so:
import React, { useState, useRef, useEffect } from 'react';
import Pikaday from 'pikaday';
import 'pikaday/css/pikaday.css';
At the top of the component add:
const EventForm = () => {
  const [event, setEvent] = useState({ ... });
  const [formErrors, setFormErrors] = useState({});

  // new line
  const dateInput = useRef(null);
  ...
}
And change the date field like so:
<div>
  <label htmlFor="event_date">
    <strong>Date:</strong>
    <input
      type="text"
      id="event_date"
      name="event_date"
      ref={dateInput}
      autoComplete="off"
    />
  </label>
</div>
As you can see, we are using the useRef hook to create a reference to the date input field, so we can access it elsewhere in the code.
Next, we need to add a useEffect hook to initialize the datepicker when the component is mounted.
useEffect(() => {
  const p = new Pikaday({
    field: dateInput.current,
    onSelect: (date) => {
      const formattedDate = formatDate(date);
      dateInput.current.value = formattedDate;
      updateEvent('event_date', formattedDate);
    },
  });

  // Return a cleanup function.
  // React will call this prior to unmounting.
  return () => p.destroy();
}, []);
Thanks to our ref, the field property of the configuration object that we are passing to Pikaday’s constructor, points to DOM element we want to turn into a datepicker. The onSelect method determines what will happen when the user selects a date. In this case, the date is formatted into a YYYY-MM-DD string and the event object we are holding in state is updated.
We can write the formatDate function as a helper method in app/javascript/helpers/helpers.js. This receives a Date object and returns a YYYY-MM-DD string.
export const formatDate = (d) => {
  const YYYY = d.getFullYear();
  const MM = `0${d.getMonth() + 1}`.slice(-2);
  const DD = `0${d.getDate()}`.slice(-2);

  return `${YYYY}-${MM}-${DD}`;
};
Don’t forget to import it in the <EventForm> component:
import { formatDate, isEmptyObject, validateEvent } from '../helpers/helpers';
We can declare the updateEvent method in the <EventForm> component:
const updateEvent = (key, value) => {
  setEvent((prevEvent) => ({ ...prevEvent, [key]: value }));
};
Notice that we are calling the setEvent function slightly differently in that we are passing it a function as an argument. This callback function receives the previous value of event, which we spread into a new object, updating the key/value pair that has changed. This object is returned as the new value of event.
We need to do it like this — and not setEvent({ ...event, [key]: value }) — as otherwise, inside the onSelect method, event will point to its initial value (i.e. an empty object). This is because when it is declared, onSelect forms a closure over event and captures an incorrect value. You can read more about this here: Be Aware of Stale Closures when Using React Hooks.
Alternatively, we could add event to the useEffect dependency array, which would solve the problem. This would however, mean that we are creating a new datepicker every time the user types a character into our form, which is not ideal. There’s more on this in this GitHub issue.
Finally, let’s update our handleInputChange function to use this new method:
const handleInputChange = (e) => {
  const { target } = e;
  const { name } = target;
  const value = target.type === 'checkbox' ? target.checked : target.value;

  updateEvent(name, value);
};
And that’s it. We now have a datepicker.

Warning in Webpack Console
If you are following along using Shakapacker you will see a warning in the console at this point. If you are using esbuild, skip to the next section.
The warning is:
WARNING in ./node_modules/pikaday/pikaday.js 15:23-40
Module not found: Error: Can't resolve 'moment' ...
This is caused by the fact that Pikaday has made moment an optional dependency — if it is available, Pikaday requires it, otherwise it doesn’t. Unfortunately, this causes webpack to throw the above error. There is quite a lengthy issue looking at why that is here: https://github.com/webpack/webpack/issues/196.
The Pikaday maintainer doesn’t regard this as problematic and his advice is to ignore the warning. If we are going to do that, then it would be better to turn off webpack’s full-screen error overlay in config/webpacker.yml:
client:
  # Should we show a full-screen overlay in the browser
  # when there are compiler errors or warnings?
  overlay: false
Alternatively, you can get rid of the error by commenting out the Moment requires in node_modules/pikaday/pikaday.js:
(function (root, factory)
{
    'use strict';

    var moment;
    if (typeof exports === 'object') {
        // CommonJS module
        // Load moment.js as an optional dependency
        // try { moment = require('moment'); } catch (e) {}
        module.exports = factory(moment);
    } else if (typeof define === 'function' && define.amd) {
        // AMD. Register as an anonymous module.
        define(function (req)
        {
            // Load moment.js as an optional dependency
            var id = 'moment';
            // try { moment = req(id); } catch (e) {}
            return factory(moment);
        });
    } else {
        root.Pikaday = factory(root.moment);
    }
}(this, function (moment)
Why Pikaday?
So why are we using Pikaday? In addition to the ugly warning Shakapacker users are seeing, there doesn’t seem to be much active development happening on the project. Its GitHub repo has a lot of open issues, with a couple of them calling for the project to be marked as unmaintained.
Nonetheless, Pikaday is downloaded over 1 million times each month. The current version is stable, used in production and is adequate for our use case. I also wanted to demonstrate how to include a third party library in a React application.
If you would rather use a component-based solution, I recommend React Date Picker. It’s simple to set up and seems to be under active development. Otherwise you could try any of the other solutions out there.
Ref.:
- https://reactjs.org/docs/integrating-with-other-libraries.html
- https://stackoverflow.com/questions/30058477/how-can-i-use-pikaday-with-reactjs
Saving an Event
Currently, if you save a valid event, the event is logged to the console and nothing else happens. To actually save it to the database, we’re going to pass a callback function to our <EventForm> component, that can be called in the context of its parent.
In the <Editor> component:
import { Routes, Route, useNavigate } from 'react-router-dom';
...

const Editor = () => {
  ...
  const navigate = useNavigate();

  useEffect(() => { ... }, []);

  const addEvent = async (newEvent) => {
    try {
      const response = await window.fetch('/api/events', {
        method: 'POST',
        body: JSON.stringify(newEvent),
        headers: {
          Accept: 'application/json',
          'Content-Type': 'application/json',
        },
      });
      if (!response.ok) throw Error(response.statusText);

      const savedEvent = await response.json();
      const newEvents = [...events, savedEvent];
      setEvents(newEvents);
      window.alert('Event Added!');
      navigate(`/events/${savedEvent.id}`);
    } catch (error) {
      console.error(error);
    }
  };

  return (
    <>
      ...
        <Routes>
          <Route path="new" element={<EventForm onSave={addEvent} />} />
          <Route path=":id" element={<Event events={events} />} />
        </Routes>
      ...
    </>
  );
};
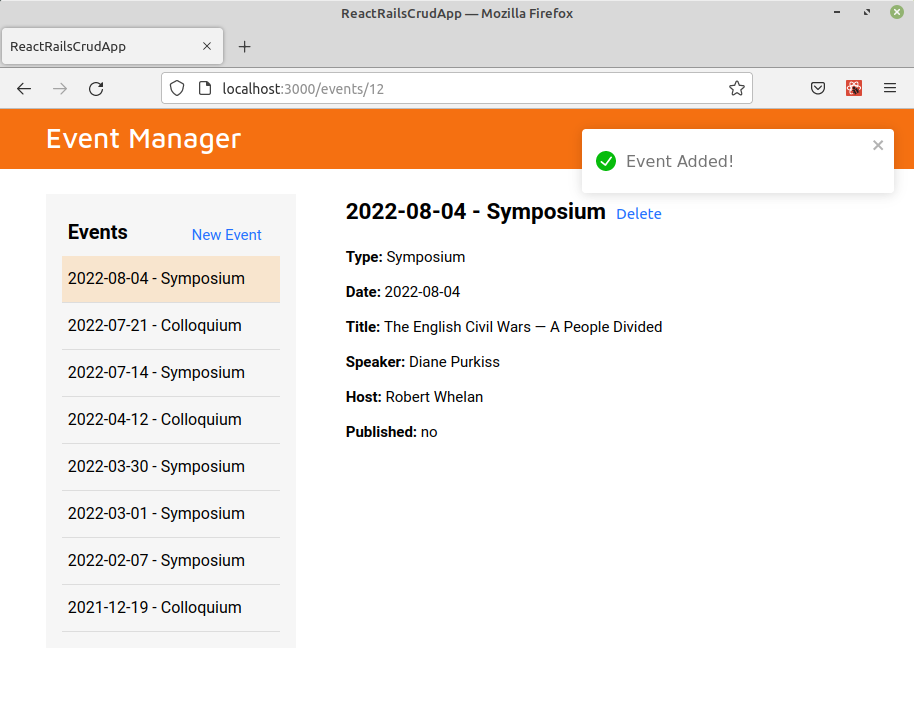
As you can see, we have defined an addEvent method, which receives a newEvent object and then fires off a request to our API to create a new event using that data. If the request is successful, it will add the newly created event to the array of events that are being held in state and the UI will update accordingly. It will also use the navigate function, which is made available to us by the useNavigate hook, to change the URL to that of the newly created event.
In the case that the API request is not successful (e.g. network problems, server responds with an error code etc), the error is logged to the console.
Note also that we are passing the addEvent method into the EventForm component as a callback. Now, all we’ve got to do is call it in our <EventForm> component:
import PropTypes from 'prop-types';
...

const EventForm = ({ onSave }) => {
  ...

  const handleSubmit = (e) => {
    e.preventDefault();
    const errors = validateEvent(event);

    if (!isEmptyObject(errors)) {
      setFormErrors(errors);
    } else {
      onSave(event);
    }
  };

  return ( ... );
};

export default EventForm;

EventForm.propTypes = {
  onSave: PropTypes.func.isRequired,
};
Now, when you attempt to save an event to the database, you should get an alert pop up, informing you that the save was successful. If you’re following along, I’d encourage you to give this a try and satisfy yourself that everything is working before continuing.
Deleting Events
Now, if you’re anything like me, you will have created a bunch of silly events while following along with this tutorial. Let’s add a delete button so that we can nuke them. 💥
As with adding an event, we’ll want to declare a method to delete an event in our <Editor> component, then pass it to our <Event> component as a prop.
First the method:
const Editor = () => {
  ...

  const addEvent = async (newEvent) => { ... };

  const deleteEvent = async (eventId) => {
    const sure = window.confirm('Are you sure?');

    if (sure) {
      try {
        const response = await window.fetch(`/api/events/${eventId}`, {
          method: 'DELETE',
        });

        if (!response.ok) throw Error(response.statusText);

        window.alert('Event Deleted!');
        navigate('/events');
        setEvents(events.filter(event => event.id !== eventId));
      } catch (error) {
        console.error(error);
      }
    }
  };

  return ( ... );
};
In our deleteEvent method, we ask the user for confirmation that they really want to delete the event via a confirm dialogue. If the user is sure, we send a DELETE request to our API and once a successful response comes back, we inform the user that the event has been deleted, redirect the user to /events and remove the deleted event from state. As with the addEvent method, if the request is unsuccessful, the error is logged to the console.
Next, pass the deleteEvent callback to the <Event> component:
<Routes>
  <Route path="new" element={<EventForm onSave={addEvent} />} />
  <Route path=":id" element={<Event events={events} onDelete={deleteEvent} />} />
</Routes>
Now, in the <Event> component we can create a button to delete the event. We’re not using a <Link> component here (as we do for creating a new event), as this is not a hypertext link that can be followed or be crawled. To remain consistent with the styling though, I have styled it to look like a link in the CSS above.
const Event = ({ events, onDelete }) => {
  ...

  return (
    <div className="eventContainer">
      <h2>
        {event.event_date}
        {' - '}
        {event.event_type}
        <button
          className="delete"
          type="button"
          onClick={() => onDelete(event.id)}
        >
          Delete
        </button>
      </h2>
      ...
    </div>
  );
};

Event.propTypes = {
  events: PropTypes.arrayOf(
    PropTypes.shape({ ... })
  ).isRequired,
  onDelete: PropTypes.func.isRequired,
};
And now we can delete events.
Adding Flash Messages
Alerts are all well and good to tell the user that something happened, but they don’t look very pretty. Let’s add flash message functionality instead, using the React-Toastify library.
npm i react-toastify
Or with Yarn:
yarn add react-toastify
We’ll stick this functionality in its own helper file, notifications.js.
touch app/javascript/helpers/notifications.js
Then add:
import { toast, Flip } from 'react-toastify';
import 'react-toastify/dist/ReactToastify.css';

const defaults = {
  position: 'top-right',
  autoClose: 5000,
  hideProgressBar: true,
  closeOnClick: true,
  pauseOnHover: true,
  draggable: true,
  progress: undefined,
  transition: Flip,
};

export const success = (message, options = {}) => {
  toast.success(message, Object.assign(defaults, options));
};

export const info = (message, options = {}) => {
  toast.info(message, Object.assign(defaults, options));
};

export const warn = (message, options = {}) => {
  toast.warn(message, Object.assign(defaults, options));
};

export const error = (message, options = {}) => {
  toast.error(message, Object.assign(defaults, options));
};
Now we have a centralized place to set some sensible defaults and can reduce the boilerplate when calling the flash messages. React-Toastify is highly configurable, so if you’d like to see what else the library can do, head on over to their playground and experiment with the notifications until you find a style you like. Also be sure to check out the different transition effects, as these are configurable, too.
Next, include the library in the <App> component:
import { ToastContainer } from 'react-toastify';

...

const App = () => (
  <>
    <Routes>
      <Route path="events/*" element={<Editor />} />
    </Routes>
    <ToastContainer />
  </>
);
Here we are adding a ToastContainer to our app, for the flash messages (or toast messages, I guess I should say) to display.
Then alter the <Editor> component to replace our alerts:
import { success } from '../helpers/notifications';
...
const addEvent = async (newEvent) => {
  try {
    ...
-   window.alert('Event Added!);
+   success('Event Added!');
    ...
  } catch (error) {
    console.error(error);
  }
};

const deleteEvent = async (eventId) => {
  const sure = window.confirm('Are you sure?');

  if (sure) {
    try {
      ...
-   window.alert('Event Deleted!);
+   success('Event Deleted!');
    ...
    } catch (error) {
      console.error(error);
    }
  }
};
While we’re at it we can move the error handling into a helper method, too. In app/javascript/helpers/helpers.js:
import { error } from './notifications';
...
export const handleAjaxError = (err) => {
  error('Something went wrong');
  console.error(err);
};
And in the <Editor> component:
import { handleAjaxError } from '../helpers/helpers';
And replace the three occurrences of:
console.error(error);
With:
handleAjaxError(error);
The following lines can also be removed from the component, as they are no longer needed.
- const [isError, setIsError] = useState(false);
- setIsError(true);
- {isError && <p>Something went wrong. Check the console.</p>}
Now, when you create or delete an event, you should get a nicely styled flash message.
Note that if you are testing the error message functionality (e.g. by making a typo in an endpoint), you will see two flash messages telling you that something has gone wrong, where you might have expected one. The reason for this is the use of
StrictMode, which renders components twice (in development only) so as to detect any problems with your code and warn you accordingly.
Updating an Event
The final piece of our CRUD functionality to add is the ability to update an event. To avoid duplication we’re going to reuse our <EventForm> component. If we pass it a list of events, it should grab the event ID from the URL, find the correct event from the list, then prepopulate the form fields with the correct values. We will also define an updateEvent function that will allow us to perform a different action when the user hits the Save button, depending on whether we are creating an event, or updating an existing one.
Let’s start by adding the Edit link to the <Event> component. It’s fine to make this a link, as it will change the URL:
import { useParams, Link } from 'react-router-dom';
...
<h2>
  {event.event_date}
  {' - '}
  {event.event_type}
  <Link to={`/events/${event.id}/edit`}>Edit</Link>
  <button
    className="delete"
    type="button"
    onClick={() => onDelete(event.id)}
  >
    Delete
  </button>
</h2>
In the <Editor> component, let’s add the updateEvent function :
const updateEvent = async (updatedEvent) => {
  try {
    const response = await window.fetch(
      `/api/events/${updatedEvent.id}`,
      {
        method: 'PUT',
        body: JSON.stringify(updatedEvent),
        headers: {
          Accept: 'application/json',
          'Content-Type': 'application/json',
        },
      }
    );

    if (!response.ok) throw Error(response.statusText);

    const newEvents = events;
    const idx = newEvents.findIndex((event) => event.id === updatedEvent.id);
    newEvents[idx] = updatedEvent;
    setEvents(newEvents);

    success('Event Updated!');
    navigate(`/events/${updatedEvent.id}`);
  } catch (error) {
    handleAjaxError(error);
  }
};
Hopefully, this is starting to feel a little familiar by now. Here we send a PUT request to the API with the updated event data. If we get a good response back (i.e. no error) then we create a newEvents variable, setting it to the current value of events. We then determine the index of the updated event inside the newEvents array and swap out the old event with the new one. Finally, we update the value of events in state, before showing the user a success message and programatically navigating to the new event.
We go through the trouble of creating an additional variable, as it is good practice not to mutate state directly.
Next, let’s declare a new route for editing events which will render our <EventForm> component:
<Routes>
  <Route
    path=":id"
    element={<Event events={events} onDelete={deleteEvent} />}
  />
  <Route
    path=":id/edit"
    element={<EventForm events={events} onSave={updateEvent} />}
  />
  <Route path="new" element={<EventForm onSave={addEvent} />} />
</Routes>
In the <EventForm> component, we need to make sure that the form fields are populated with the correct values, whenever we pass it a list of events.
Remove the following code from the component:
- const [event, setEvent] = useState({
-   event_type: '',
-   event_date: '',
-   title: '',
-   speaker: '',
-   host: '',
-   published: false,
- });
Then add the following:
import { useParams } from 'react-router-dom';
...

const EventForm = ({ events, onSave }) => {
  const { id } = useParams();

  const defaults = {
    event_type: '',
    event_date: '',
    title: '',
    speaker: '',
    host: '',
    published: false,
  }

  const currEvent = id? events.find((e) => e.id === Number(id)) : {};
  const initialEventState = { ...defaults, ...currEvent }
  const [event, setEvent] = useState(initialEventState);
  ...
}
Here we are using React Router’s useParams hook to retrieve the ID of the current event from the URL. This will either be an integer or, when the form is being used to create a new event, undefined. We then declare some sensible defaults for our event fields.
Next we check the value of the id variable. If it is undefined (we are creating a new event), we set currEvent to be an empty object. Otherwise, we filter our array of events to find the event we are updating, and set the value of currEvent to that.
We then merge defaults and currEvent into a new variable called initialEventState before declaring an event property in state and initializing it with the value of initialEventState.
This has the effect of event being initialized with some sensible defaults, or the value of the event we wish to edit.
This might seem like a bit of a convoluted way to do things and ideally I would have liked to pass the <EventForm> component only the event it needed to display. However, since upgrading to React router 6, I have been unable to find a way to reference the :id property in the parent component while keeping the routes as they are. If anyone has a suggestion as to how to do this, I’d be more than happy to hear it in the comments bellow.
Next, we need to make sure the form is initialized with the correct values from event and we need to update the component’s prop validation:
return (
  <div>
    <h2>New Event</h2>
    {renderErrors()}

    <form className="eventForm" onSubmit={handleSubmit}>
      <div>
        <label htmlFor="event_type">
          <strong>Type:</strong>
          <input
            type="text"
            id="event_type"
            name="event_type"
            onChange={handleInputChange}
            value={event.event_type}
          />
        </label>
      </div>
      <div>
        <label htmlFor="event_date">
          <strong>Date:</strong>
          <input
            type="text"
            id="event_date"
            name="event_date"
            ref={dateInput}
            autoComplete="off"
            value={event.event_date}
            onChange={handleInputChange}
          />
        </label>
      </div>
      <div>
        <label htmlFor="title">
          <strong>Title:</strong>
          <textarea
            cols="30"
            rows="10"
            id="title"
            name="title"
            onChange={handleInputChange}
            value={event.title}
          />
        </label>
      </div>
      <div>
        <label htmlFor="speaker">
          <strong>Speakers:</strong>
          <input
            type="text"
            id="speaker"
            name="speaker"
            onChange={handleInputChange}
            value={event.speaker}
          />
        </label>
      </div>
      <div>
        <label htmlFor="host">
          <strong>Hosts:</strong>
          <input
            type="text"
            id="host"
            name="host"
            onChange={handleInputChange}
            value={event.host}
          />
        </label>
      </div>
      <div>
        <label htmlFor="published">
          <strong>Publish:</strong>
          <input
            type="checkbox"
            id="published"
            name="published"
            onChange={handleInputChange}
            checked={event.published}
          />
        </label>
      </div>
      <div className="form-actions">
        <button type="submit">Save</button>
      </div>
    </form>
  </div>
);

...

EventForm.propTypes = {
  events: PropTypes.arrayOf(
    PropTypes.shape({
      id: PropTypes.number.isRequired,
      event_type: PropTypes.string.isRequired,
      event_date: PropTypes.string.isRequired,
      title: PropTypes.string.isRequired,
      speaker: PropTypes.string.isRequired,
      host: PropTypes.string.isRequired,
      published: PropTypes.bool.isRequired,
    })
  ),
  onSave: PropTypes.func.isRequired,
};

EventForm.defaultProps = {
  events: [],
};
We also need to pass the datepicker a toString function in its initial configuration, so that the date is formatted properly when the event date is added to the form:
useEffect(() => {
  const p = new Pikaday({
    field: dateInput.current,
+   toString: date => formatDate(date),
    onSelect: (date) => { ... },
  });

  // Return a cleanup function.
  // React will call this prior to unmounting.
  return () => p.destroy();
}, []);
And finally, we need to add another useEffect hook to ensure that the fields are cleared when a user is editing an event, then clicks New Event. This would have been accomplished by using the componentWillReceiveProps lifecycle method in a class-based component.
useEffect(() => {
  setEvent(initialEventState);
}, [events]);
Notice that we are specifying the prop that we want to watch for changes in the dependency array.
And that’s that. We now have all of our CRUD functionality. Open the app and satisfy yourself that everything is working before moving on.
Dealing With the ESLint Warning
If you installed ESLint earlier, you’ll notice a warning if at this point we lint our code.
 So what is going on here?
Well, what the warning is telling us is that our second useEffect hook is using a value which could potentially change between renders. It’s complaining about initialEventState which is defined like so:
const defaults = { ... };
const currEvent = id? events.find((e) => e.id === Number(id)) : {};
const initialEventState = { ...defaults, ...currEvent }
The culprit is currEvent whose value is dependent on both id and events.
Now we could just switch this warning off, like so:
// eslint-disable-next-line react-hooks/exhaustive-deps
useEffect(() => {
  setEvent(initialEventState);
}, [events]);
But the React team explicitly advise against doing this.
If we follow the advice in the warning above and move initialState inside the dependency array like so:
useEffect(() => {
  setEvent(initialEventState);
}, [events, initialEventState]);
It just gives us a different warning:
The 'initialEventState' object makes the dependencies of useEffect Hook (at line 58) change on every render.
To fix this, wrap the initialization of 'initialEventState' in its own useMemo() Hook.
And, as a nasty side-effect, we can no-longer use our form, as the form reverts to its initial state after every key stroke.
To fix this up, we can employ a useCallback hook, like so:
Delete the following code from the component:
- const defaults = {
-   event_type: '',
-   event_date: '',
-   title: '',
-   speaker: '',
-   host: '',
-   published: false,
- }
- const currEvent = id? events.find((e) => e.id === Number(id)) : {};
- const initialEventState = { ...defaults, ...currEvent }
And replace it with the following:
const initialEventState = useCallback(
  () => {
    const defaults = {
      event_type: '',
      event_date: '',
      title: '',
      speaker: '',
      host: '',
      published: false,
    };

    const currEvent = id ?
      events.find((e) => e.id === Number(id)) :
      {};

    return { ...defaults, ...currEvent }
  },
  [events, id]
);
We also need to import useCallback at the top of the component:
import React, { useState, useRef, useEffect, useCallback } from 'react';
The useCallback hook returns a memoized version of a function, which won’t change on every render unless its own dependencies (events and id) also change. This is exactly what we want.
You can read more about this here: Is it safe to omit functions from the list of dependencies?
Adding Some Form Tweaks
Next, let’s add a Cancel button to the form (in case the user changes their mind whilst editing or creating an event). We’ll also change the title of the form to reflect which action they are performing. And while we’re at it, we’ll improve the validation for our date field — at the moment it just checks if the user has entered a value.
In the <EventForm> component:
import { useParams, Link } from 'react-router-dom';

const EventForm = ({ events, onSave }) => {
  ...
  const cancelURL = event.id ? `/events/${event.id}` : '/events';
  const title = event.id ? `${event.event_date} - ${event.event_type}` : 'New Event';

  return (
    <div>
      <h2>{title}</h2>
      {renderErrors()}
      <form className="eventForm" onSubmit={handleSubmit}>
        ...
        <div className="form-actions">
          <button type="submit">Save</button>
          <Link to={cancelURL}>Cancel</Link>
        </div>
      </form>
    </div>
  );
};
And the date validation in helpers.js:
const isValidDate = dateObj => !Number.isNaN(Date.parse(dateObj));

export const validateEvent = (event) => {
  ...

  if (!isValidDate(event.event_date)) {
    errors.event_date = 'You must enter a valid date';
  }

 ...

  return errors;
};
Finally, let’s make the header a link, that returns us to the main view. In the <Header> component:
import { Link } from 'react-router-dom';

const Header = () => (
  <header>
    <Link to='/events/'>
      <h1>Event Manager</h1>
    </Link>
  </header>
);
Adding Search
It’d be nice to add search functionality to the events list. Luckily this is not complicated as we are holding all the events in state.
Let’s start off by adding a search input in our <EventList> component:
const EventList = ({ events }) => {
  ...
  return (
    <section className="eventList">
      <h2>
        Events
        <Link to="/events/new">New Event</Link>
      </h2>

      <input
        className="search"
        placeholder="Search"
        type="text"
        ref={searchInput}
        onKeyUp={updateSearchTerm}
      />

      <ul>{renderEvents(events)}</ul>
    </section>
  );
};
Notice that we have added a ref to the input element, so that we can reference it elsewhere in our component. Now let’s create that ref and declare a searchTerm property in state.
import React, { useState, useRef } from 'react';
...

const EventList = ({ events }) => {
  const [searchTerm, setSearchTerm] = useState('');
  const searchInput = useRef(null);

  const updateSearchTerm = () => {
    setSearchTerm(searchInput.current.value);
  };
  ...
}
We’re also creating a updateSearchTerm method which will be called every time a key press is registered on the search field.
The list of events is rendered in the renderEvents method. Let’s apply a filter to our event list, so that only events matching the search criteria are displayed. Replace the entire renderEvents function with the following:
const renderEvents = (eventArray) =>
  eventArray
    .filter((el) => matchSearchTerm(el))
    .sort((a, b) => new Date(b.event_date) - new Date(a.event_date))
    .map((event) => (
      <li key={event.id}>
        <NavLink to={`/events/${event.id}`}>
          {event.event_date}
          {' - '}
          {event.event_type}
        </NavLink>
      </li>
    ));
And finally, we need the matchSearchTerm method:
const EventList = ({ events }) => {
  ...

  const matchSearchTerm = (obj) => {
    const { id, published, created_at, updated_at, ...rest } = obj;
    return Object.values(rest).some(
      (value) => value.toLowerCase().indexOf(searchTerm.toLowerCase()) > -1
    );
  };

  const renderEvents = (eventArray) => ... ;

  return ( ... );
};
Here, we are excluding some database fields that were returned by the original Ajax call, but which we are not interested in filtering by. Then, we are returning only those events which contain our search term in any of the relevant fields.
Et voilà! We have rudimentary search.

Adding a 404 Component
The last thing we will do is add a component to render when an event is not found. This might be useful if a user has bookmarked an event which has since been deleted.
First, create the new component:
touch app/javascript/components/EventNotFound.js
And add the content. Nothing exciting here:
import React from 'react';

const EventNotFound = () => <p>Event not found!</p>;

export default EventNotFound;
Now we need to update the <Event> component:
import EventNotFound from './EventNotFound';

const Event = ({ events, onDelete }) => {
  ...

  if (!event) return <EventNotFound />;

  return ( ... );
};
And finally, the <EventForm> component:
import EventNotFound from './EventNotFound';

const EventForm = ({ events, onSave }) => {
  ...

  if (id && !event.id) return <EventNotFound />;

  return ( ... );
};
Now if the user attempts to view or edit a non-existent event, they will be shown a 404 component.
Conclusion
And that’s everything. Well done if you’ve made it up to here. You should now have a fully functioning React/Rails CRUD app, as well as a reasonable overview of all of the moving parts involved in building something like this. I hope this tutorial has left you with a good jumping off point for creating a similar SPA of your own.
If you’re looking to continue honing your skills, there are a several further steps you can consider. You could, for example deploy the app to Heroku, add authentication, or port the backend to use Node.
Either way, I’d be glad to hear your comments in the discussion below, and don’t forget, the full source code for this tutorial is available on GitHub.
Comments