![]() This content is outdated and has been left here for reference purposes.
If you are building a CRUD app with React today, you should probably follow
this updated tutorial instead.
This content is outdated and has been left here for reference purposes.
If you are building a CRUD app with React today, you should probably follow
this updated tutorial instead.
Most web applications need to persist data in one form or other. When working with a server-side language, this is normally a straightforward task. However when you add a front-end JavaScript framework to the mix, things start to get a bit trickier.
In this tutorial I am going to demonstrate how to build a JSON API using Ruby on Rails and then code a fully-functional React frontend to interact with the API. The app we’ll be building is an event manager, which will let you create and manage a list of academic events.
The app will showcase basic CRUD functionality and will add a couple of extra features (such as a datepicker and search). To integrate the React frontend with the Rails backend, I’ll be using the Webpacker gem, which will ship as the default JavaScript bundler for Rails 6.
This is what the finished app will look like.
 You can find the complete code for the tutorial on GitHub.
Prerequisites
To follow along, you’ll need both Ruby and Node installed on your system. For Ruby you can either go here and download the official binaries for your system, or use a version manager such as rbenv.
The same goes for Node. You can either go here and download the official binaries for your system, or use a version manager such as nvm.
In both cases I would encourage people to use a version manager. They are easy to set up and make managing multiple versions of Node/Ruby a breeze. They also help negate permissions problems, meaning you don’t end up having to install gems/packages with admin rights.
For this tutorial I’ll be using Ruby version 2.6, Rails version 5.2.2. and Node version 10.15.0 (the latest LTS). My operating system is Linux Mint, so any terminal related commands will be tailored towards ‘nix.
Building the API
The first thing we’ll need to do is to install Rails and create a new Rails app.
gem install rails
rails new event-manager
Depending on your OS, you might need to install the libsqlite3-dev library, as unless otherwise specified, Rails uses SQLite as its database.
sudo apt-get install libsqlite3-dev
Model
Next, change into the project directory and create an Event model:
rails g model Event \
event_type:string \
event_date:date \
title:text \
speaker:string \
host:string \
published:boolean
Create the databases and tables:
rake db:create
rake db:migrate
Finally, seed the model with some test data. You can do this by creating a db/seeds/events.json file and adding the contents from the corresponding file in the project repo.
Then in db/seeds.rb, add:
json = ActiveSupport::JSON.decode(File.read('db/seeds/events.json'))
json.each do |record|
  Event.create!(record)
end
And run rake db:seed. Start up the rails console with rails c and confirm that you have some data:
rails c
Running via Spring preloader in process 32213
Loading development environment (Rails 5.2.2)
irb(main):001:0> Event.all.count
   (0.3ms)  SELECT COUNT(*) FROM "events"
=> 6
Controllers
In the next step, we’ll create an Events controller to respond to incoming requests to our API. We’ll put the controller in its own folder, as we’re going to namespace it. This will keep our code nice and organized and allow us to create our own set of routes for the API.
mkdir app/controllers/api
touch app/controllers/api/events_controller.rb
Next, we’re going to install the responders gem. This will provide us with a respond_with method which will keep the controller code nice and DRY. This method used to be part of Rails core, but was moved into a gem in Rails 4.2.
Add the following to your Gemfile:
gem 'responders'
Then run the bundle command.
Next, add the following code to app/controllers/api/events_controller.rb. Notice that we’ve namespaced it under Api.
class Api::EventsController < ApplicationController
  respond_to :json

  def index
    respond_with Event.order(event_date: :DESC)
  end

  def show
    respond_with Event.find(params[:id])
  end

  def create
    respond_with :api, Event.create(event_params)
  end

  def destroy
    respond_with Event.destroy(params[:id])
  end

  def update
    event = Event.find(params['id'])
    event.update(event_params)
    respond_with Event, json: event
  end

  private

  def event_params
    params.require(:event).permit(
      :id,
      :event_type,
      :event_date,
      :title,
      :speaker,
      :host,
      :published
    )
  end
end
Here we start off by declaring that our controller will respond to JSON requests. We then define controller methods corresponding to the CRUD actions we wish to perform, then finish off by listing which parameters may be used for mass assignment.
Notice the use of the respond_with method which allows us to render a resource as JSON. Without this method, you would write something like:
def index
  respond_to do |format|
    format.json { render json: Event.order(event_date: :DESC) }
  end
end
Which, applied to the whole controller, would make for quite a bit more code.
The final thing we need to do regarding controllers is to change the forgery protection method in app/controllers/application_controller.rb:
class ApplicationController < ActionController::Base
  protect_from_forgery with: :null_session
end
The reason this is necessary is that Rails has a built in mechanism to protect against cross site request forgery (CSRF) attacks. By default this sees Rails generate a unique token and validate its authenticity with each POST PUT PATCH DELETE request. If the token is missing, Rails will throw an exception.
However, as we are building a single-page app, we will only have a fresh token upon first render, which means we will need to alter this behaviour. The above code ensures that if no CSRF token is provided, Rails will respond with an empty session, which is fine for our purposes.
If you’d like to read more about this, check out:
- Understanding Rails’ Forgery Protection Strategies
- A Deep Dive into CSRF Protection in Rails
- Rails CSRF protection for SPA
- Configuring Rails as a JSON API
- Rails 4 CSRF Protection with Clients using APIs
Routes
Finally let’s fix up the routes in config/routes.rb. The routing for the controller has to consider the fact that it’s within the Api namespace. We’ll do this using the namespace method.
Rails.application.routes.draw do
  namespace :api do
    resources :events, only: %i[index show create destroy update]
  end
end
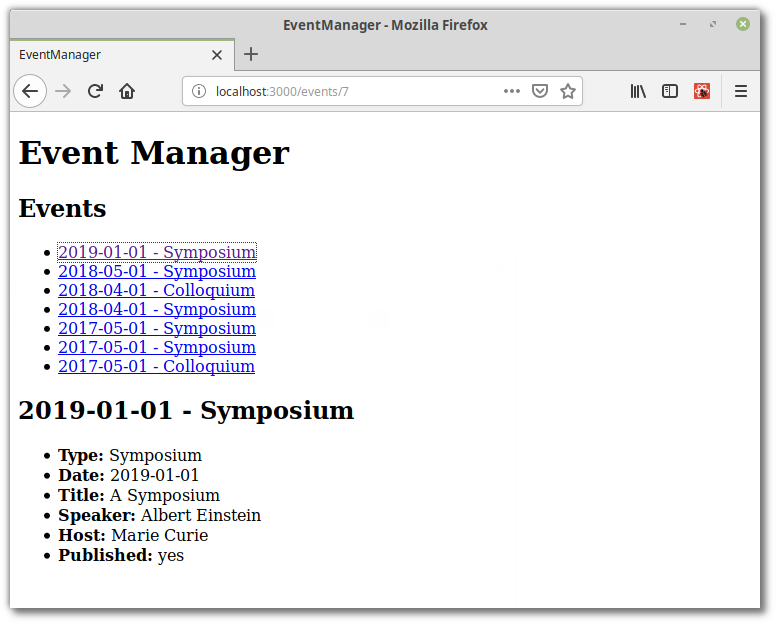
At this point if you start the server with rails s, you you can hit the various endpoints and interact with the API. E.g. http://localhost:3000/api/events.json
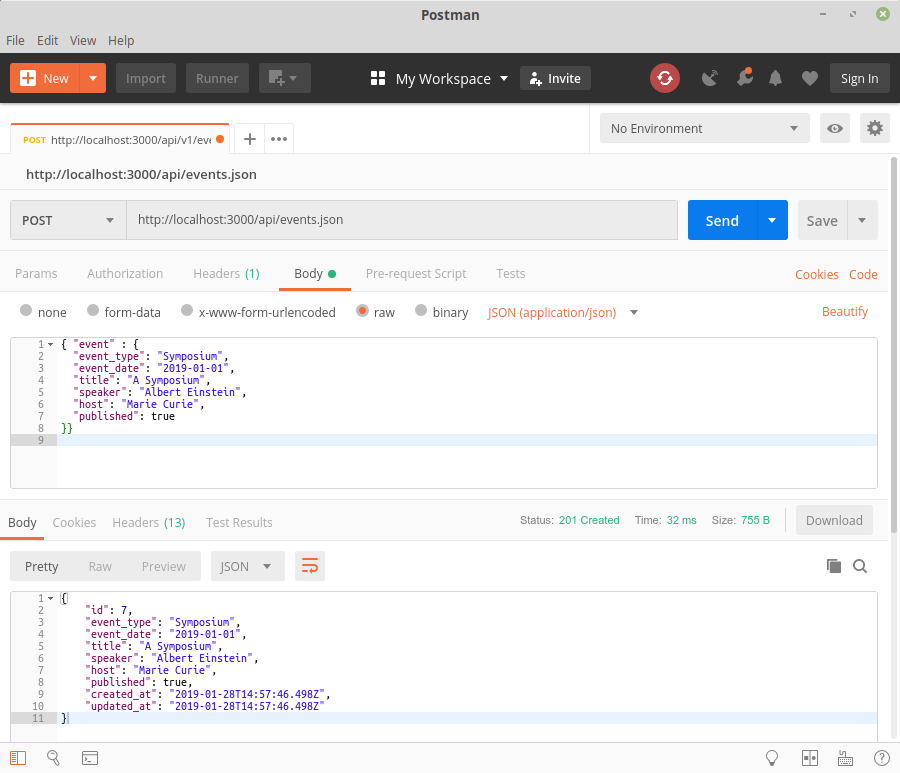
You might also like to test the API with Postman. Here’s how you would create a new event.
Set the request type to POST, the URL to http://localhost:3000/api/events.json, the Headers to Content-Type: application/json and under Body > raw enter:
{ "event" : {
  "event_type": "Symposium",
  "event_date": "2019-01-01",
  "title": "A Symposium",
  "speaker": "Albert Einstein",
  "host": "Marie Curie",
  "published": true
}}
Installing Webpacker
The next thing we want to do is to install the Webpacker gem. This will allow us to use webpack, the JavaScript pre-processor and bundler, to manage application-like JavaScript in Rails.
Add it to your Gemfile, then run the bundle command.
gem 'webpacker', '>= 4.0.x'
Next, we’re going to need to install Yarn, as this is Webpacker’s package manager of choice.
npm i -g yarn
Then run:
yarn add @rails/webpacker@next
to get the latest version of the @rails/webpacker package.
Finally, to bootstrap everything:
bundle exec rails webpacker:install
Configuring Webpacker
Let’s add a site controller with a blank index action, and make that the root of our new project.
touch app/controllers/site_controller.rb
mkdir app/views/site
touch app/views/site/index.html.erb
In app/controllers/site_controller.rb;
class SiteController < ApplicationController
  def index; end
end
In app/views/site/index.html.erb;
<div id="root"></div>
In config/routes.rb;
Rails.application.routes.draw do
  root 'site#index'

  namespace :api do
    resources :events, only: %i[index show create destroy update]
  end
end
We’ll also need to include Webpacker’s javascript_pack_tag in the <head> section of app/views/layouts/application.html.erb:
<%= javascript_pack_tag 'application' %>
Now (re)start the Rails server, hit http://localhost:3000/ and you should see “Hello World from Webpacker” logged to the console.
This is being generated from app/javascript/packs/application.js. If you want to assure yourself that Webpacker is working properly, open this file and add some tricky new JavaScript:
const {a, b, c, ...rest} = {a: 1, b: 2, c: 3, d: 4, e: 5};
console.log(rest);
Refresh the page and you should see Object { d: 4, e: 5 } logged to the console. Additionally if you inspect the source, you will notice that this ES2018 syntax has been piped through Babel to produce ES5 compliant JavaScript.
Adding a Basic React App
This is easy using the built-in installer:
bundle exec rails webpacker:install:react
The installer will add all relevant dependencies using Yarn, make the necessary changes to the configuration files, and an create an example React component to your project in app/javascript/packs.
Then all you need to do is to add <%= javascript_pack_tag 'hello_react' %> to the head of app/views/layouts/application.html.erb and refresh the page. You should see “Hello React!” output to the screen.
At this point it might be advisable to have a poke around the application to see which extra files Webpacker has created and/or modified. It’s also worth having a peek in package.json to see what has been installed there.
Scaffolding the Event Manager
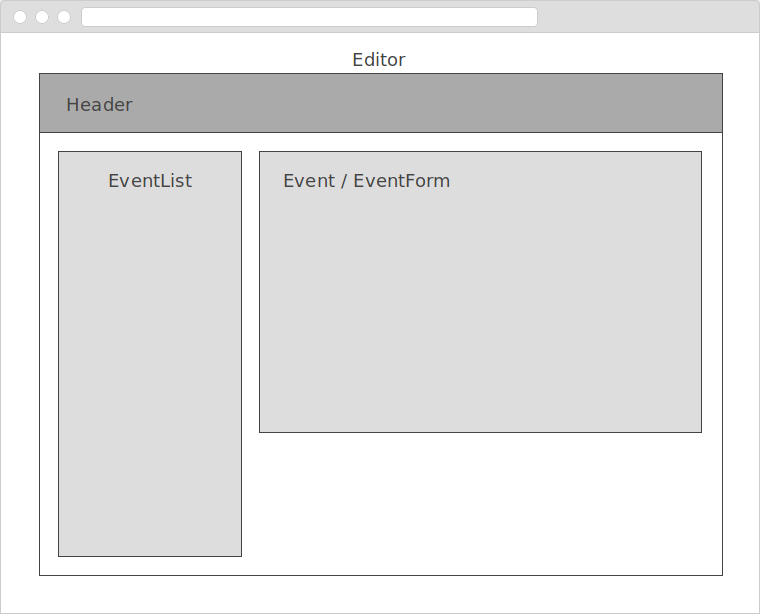
Next we need to think about how to structure our app’s UI. We’ll start off with an <Editor> component which will contain the following child components:
- A
<Header>component to display our app’s title - An
<EventList>component to display a list of events - An
<Event>component to display individual events - An
<EventForm>component to allow us to edit and create events
The whole thing will look like this:
Fetching Events
Let’s start off by creating all of the files and directories we will need in this section:
mkdir app/javascript/components
touch app/javascript/components/{App.js,Editor.js,Header.js,EventList.js}
Please note that from now on I won’t give the full path of the React components. They are all located in
app/javascript/components
Next, install axios, a Promise based HTTP client which we will be using to fetch events from our backend:
yarn add axios
Remove the <%= javascript_pack_tag 'hello_react' %> from the head of the layout file, and alter app/javascript/packs/application.js thus:
import React from 'react';
import { render } from 'react-dom';
import App from '../components/App';

document.addEventListener('DOMContentLoaded', () => {
  render(<App />, document.querySelector('#root'));
});
Now we can get on to building the React app. Let’s start off in App.js where we will require and render our <Editor> component.
import React from 'react';
import Editor from './Editor';

const App = () => (
  <div>
    <Editor />
  </div>
);

export default App;
Next, add the following code to Editor.js:
import React from 'react';
import axios from 'axios';
import Header from './Header';
import EventList from './EventList';

class Editor extends React.Component {
  constructor(props) {
    super(props);

    this.state = {
      events: null,
    };
  }

  componentDidMount() {
    axios
      .get('/api/events.json')
      .then(response => this.setState({ events: response.data }))
      .catch((error) => {
        console.log(error);
      });
  }

  render() {
    const { events } = this.state;
    if (events === null) return null;

    return (
      <div>
        <Header />
        <EventList events={events} />
      </div>
    );
  }
}

export default Editor;
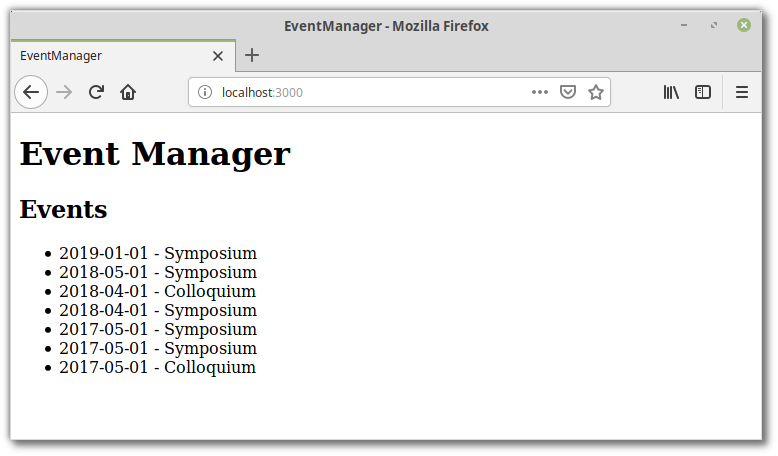
Here we are declaring an events property in state. Then we are using the componentDidMount lifecycle hook to fetch the events from the API. In the render method we have a guard to make sure nothing is rendered if the events haven’t been fetched. Once they have been fetched however, we are rendering our <EventList> components, passing it a list of events as props.
In Header.js:
import React from 'react';

const Header = () => (
  <header>
    <h1>Event Manager</h1>
  </header>
);

export default Header;
Nothing exciting going on here. We’re just rendering a header element.
In EventList.js add the following:
import React from 'react';
import PropTypes from 'prop-types';

class EventList extends React.Component {
  renderEvents() {
    const { events } = this.props;
    events.sort(
      (a, b) => new Date(b.event_date) - new Date(a.event_date),
    );

    return events.map(event => (
      <li key={event.id}>
        {event.event_date}
        {' - '}
        {event.event_type}
      </li>
    ));
  }

  render() {
    return (
      <section>
        <h2>Events</h2>
        <ul>{this.renderEvents()}</ul>
      </section>
    );
  }
}

EventList.propTypes = {
  events: PropTypes.arrayOf(PropTypes.object),
};

EventList.defaultProps = {
  events: [],
};

export default EventList;
Here we have a renderEvents method which returns a sorted list of events for the render method to display. Note that we have also implemented some simple prop validation to ensure that the component is passed an array.
If you visit http://localhost:3000 you should see a list of events displayed. Exciting, huh?
Adding React Devtools, ESLint & webpack-dev-server
Now that we’re writing some JavaScript, it’s a good time to install a couple of tools to aid our development process and to ensure the quality of our code. Let’s start with ESLint:
yarn add eslint --dev
Then add the Airbnb config to the project:
yarn add eslint-config-airbnb --dev
Next, find out what the remaining dependencies are:
npm info "eslint-config-airbnb@latest" peerDependencies
Outputs:
{
  eslint: '^4.19.1 || ^5.3.0',
  'eslint-plugin-import': '^2.14.0',
  'eslint-plugin-jsx-a11y': '^6.1.1',
  'eslint-plugin-react': '^7.11.0'
}
Add the final three packages to the devDependencies section of package.json and run yarn.
"devDependencies": {
  "eslint": "^5.12.1",
  "eslint-config-airbnb": "^17.1.0",
  "eslint-plugin-import": "^2.14.0",
  "eslint-plugin-jsx-a11y": "^6.1.1",
  "eslint-plugin-react": "^7.11.0",
  "webpack-dev-server": "^3.1.14"
}
Create an .eslintrc.js file in the project root and add:
module.exports = {
  extends: 'airbnb',
  rules: {
    'react/jsx-filename-extension': [1, { extensions: ['.js', '.jsx'] }],
    'no-console': 0,
    'no-alert': 0,
  },
};
This will tell ESlint to use the Airbnb ruleset we just installed. It will also allow files with a js ending to contain JSX and switch off warnings for console and alert statements.
You can run ESLint from the terminal:
./node_modules/.bin/eslint app/javascript
Or as an npm script:
"scripts": {
  "lint": "eslint app/javascript"
}
But for the best results, you’ll probably want to integrate it into your editor. I’m using Sublime Text 3 with SublimeLinter, SublimeLinter-eslint and ESLint-Formatter to great effect.
Also, while we are looking at tooling, you might like to take a minute to check out React’s Developer Tools. These let you inspect the React component hierarchy, including component props and state and are available as a browser extension (for Chrome and Firefox), and as a standalone app.
 And finally, to make for a better developer experience, let’s start the webpack dev server which comes with the Webpacker gem. To do this, open a second terminal (puma should be running in the first) and from the root of your project, run:
./bin/webpack-dev-server
Now, whenever changes to any app/javascript/packs/*.js files are detected, webpack will automatically reload the browser to match.
Displaying an Event
Next, let’s make the events list clickable, so that when a user selects an event, its details are displayed on the screen. For this we’re going to need React router, which will change the URL to reflect the current event and provide us with an outlet for our event information.
yarn add react-router-dom
Now let’s sort out the routes in config/routes.rb:
Rails.application.routes.draw do
  root to: redirect('/events')

  get 'events', to: 'site#index'
  get 'events/new', to: 'site#index'
  get 'events/:id', to: 'site#index'
  get 'events/:id/edit', to: 'site#index'

  namespace :api do
    resources :events, only: %i[index show create destroy update]
  end
end
In the first line we’re pointing our root route to http://localhost:3000/events, this is purely for aesthetic reasons. However in the four lines that follow, you can see that we are informing Rails about the routes we will be using in our React application. This is important, as otherwise if a user requested any of these routes directly (by refreshing the page, for example), Rails would know nothing about them and would respond with a 404. Doing things this way means that Rails can simply serve our React app and let it work out which view to display.
Now let’s add the router to app/javascript/packs/application.js:
import React from 'react';
import { render } from 'react-dom';
import { BrowserRouter } from 'react-router-dom';
import App from '../components/App';

document.addEventListener('DOMContentLoaded', () => {
  render(
    <BrowserRouter>
      <App />
    </BrowserRouter>,
    document.querySelector('#root'),
  );
});
This wraps the app in a <BrowserRouter> component, that uses the HTML5 history API to keep the UI in sync with the URL.
A small change is necessary in App.js:
import React from 'react';
import { Route } from 'react-router-dom';
import Editor from './Editor';

const App = () => (
  <div>
    <Route path="/events/:id?" component={Editor} />
  </div>
);

export default App;
Instead of rendering our <Editor> component directly, we will now use a <Route> component to render it whenever the browser’s URL matches the route’s path. As we have made the :id part of the route optional (due to the question mark) and we are pointing our root route at /events, this will always be the case.
By doing things this way, we will have access to the URL params within the <Editor> component, that will come in handy later on for determining which event we are dealing with.
Next, we’ll need an <Event> component to display the event.
touch app/javascript/components/Event.js
Then add:
import React from 'react';
import PropTypes from 'prop-types';

const Event = ({ event }) => (
  <div>
    <h2>
      {event.event_date}
      {' - '}
      {event.event_type}
    </h2>
    <ul>
      <li>
        <strong>Type:</strong>
        {' '}
        {event.event_type}
      </li>
      <li>
        <strong>Date:</strong>
        {' '}
        {event.event_date}
      </li>
      <li>
        <strong>Title:</strong>
        {' '}
        {event.title}
      </li>
      <li>
        <strong>Speaker:</strong>
        {' '}
        {event.speaker}
      </li>
      <li>
        <strong>Host:</strong>
        {' '}
        {event.host}
      </li>
      <li>
        <strong>Published:</strong>
        {' '}
        {event.published ? 'yes' : 'no'}
      </li>
    </ul>
  </div>
);

Event.propTypes = {
  event: PropTypes.shape(),
};

Event.defaultProps = {
  event: undefined,
};

export default Event;
There’s nothing too wild going on here — this component is expecting to be passed an event object as props and will display it accordingly.
Next, let’s make the list of events in <EventList> clickable. When clicked, they should navigate to /events/:id.
import { Link } from 'react-router-dom';
...
renderEvents() {
  ...
  return events.map(event => (
    <li key={event.id}>
      <Link to={`/events/${event.id}`}>
        {event.event_date}
        {' - '}
        {event.event_type}
      </Link>
    </li>
  ));
}
Here, we are making use of React router’s <Link> component to create the navigation around our application.
To make the event display in the correct place, we need to use a further route. In the <Editor> component:
...
import PropTypes from 'prop-types';
import PropsRoute from './PropsRoute';
import Event from './Event';

class Editor extends React.Component {
  ...
  render() {
    const { events } = this.state;
    if (events === null) return null;

    const { match } = this.props;
    const eventId = match.params.id;
    const event = events.find(e => e.id === Number(eventId));

    return (
      <div>
        <Header />
        <EventList events={events} />
        <PropsRoute path="/events/:id" component={Event} event={event} />
      </div>
    );
  }
}

Editor.propTypes = {
  match: PropTypes.shape(),
};

Editor.defaultProps = {
  match: undefined,
};

export default Editor;
If you look at the render method, you’ll notice we’re using a new component called <PropsRoute>. This is because when a user selects an event, we want to pass that event to the <Event> component, so that it can display it. Unfortunately, out of the box, React Router doesn’t offer an easy way to pass props to a route, so we’re left to write this ourselves.
Let’s create the component:
touch app/javascript/components/PropsRoute.js
And add the following:
import React from 'react';
import { Route } from 'react-router-dom';
import PropTypes from 'prop-types';

const renderMergedProps = (component, ...rest) => {
  const finalProps = Object.assign({}, ...rest);
  return React.createElement(component, finalProps);
};

const PropsRoute = ({ component, ...rest }) => (
  <Route {...rest} render={routeProps => renderMergedProps(component, routeProps, rest)} />
);

PropsRoute.propTypes = {
  component: PropTypes.func.isRequired,
};

export default PropsRoute;
This code is taken from here:
- https://github.com/ReactTraining/react-router/issues/4105#issuecomment-289195202
- https://github.com/ReactTraining/react-router/blob/v3/examples/passing-props-to-children/app.js
And now when you click on a link, the correct event should display.
Disable Turbolinks
Now that we have React router up and running, we need to disable Turbolinks, as it messes with the back button’s functionality.
In your Gemfile remove:
# Turbolinks makes navigating your web application faster. Read more: https://github.com/turbolinks/turbolinks
gem 'turbolinks', '~> 5'
Then run bundle.
In app/assets/javascripts/application.js remove:
//= require turbolinks
Finally, in app/views/layouts/application.html.erb remove:
<%= stylesheet_link_tag    'application', media: 'all', 'data-turbolinks-track': 'reload' %>
<%= javascript_include_tag 'application', 'data-turbolinks-track': 'reload' %>
You can find more info here: https://stackoverflow.com/questions/38649550/how-to-disable-turbolinks-in-rails-5
Adding Some Styling
The app looks pretty ugly right now, so let’s brighten it up a little. Create a file named App.css:
touch app/javascript/components/App.css
And add the following styles:
@import url("https://fonts.googleapis.com/css?family=Roboto:400,700,300,400italic");
@import url("https://fonts.googleapis.com/css?family=Maven+Pro:400,500,700");

body, html, div, blockquote, img, label, p, h1, h2, h3, h4, h5, h6, pre, ul, ol, li, dl, dt, dd, form, a, fieldset, input, th, td {
  margin: 0;
  padding: 0;
}

ul, ol {
  list-style: none;
}

body {
  font-family: Roboto;
  font-size: 16px;
  line-height: 28px;
}

header {
  background: #f57011;
  height: 60px;
}

header h1, header h1 a{
  display: inline-block;
  font-family: "Maven Pro";
  font-size: 28px;
  font-weight: 500;
  color: white;
  padding: 14px 5%;
  text-decoration: none;
}

header h1 a:hover {
  text-decoration: underline;
}

.grid {
  display: grid;
  grid-gap: 50px;
  grid-template-columns: 25% auto;
  margin: 25px auto;
  width: 90%;
  height: calc(100vh - 145px);
}

.eventList {
  background: #f6f6f6;
  padding: 16px;
}

.eventList h2 {
  font-size: 20px;
  padding: 8px 6px 10px;
}

.eventContainer {
  font-size: 15px;
  line-height: 35px;
}

.eventContainer h2 {
  margin-bottom: 10px;
}

.eventList li:hover, a.active {
  background: #f8e5ce;
}

.eventList a {
  display: block;
  color: black;
  text-decoration: none;
  border-bottom: 1px solid #dddddd;
  padding: 8px 6px 10px;
  outline: 0;
}

.eventList h2 > a {
  color: #236fff;
  font-size: 15px;
  float: right;
  font-weight: normal;
  border-bottom: none;
  padding: 0px;
}

.eventForm {
  margin-top: 15px;
}

label > strong {
  display: inline-block;
  vertical-align: top;
  text-align: right;
  width: 100px;
  margin-right: 6px;
  font-size: 15px;
}

input, textarea {
  padding: 2px 0 3px 3px;
  width: 400px;
  margin-bottom: 15px;
  box-sizing: border-box;
}

input[type="checkbox"] {
  width: 13px;
}

button[type="submit"] {
  background: #f57011;
  border: none;
  padding: 5px 25px 8px;
  font-weight: 500;
  color: white;
  cursor: pointer;
  margin: 10px 0 0 106px;
}

.errors {
  border: 1px solid red;
  border-radius: 5px;
  margin: 20px 0 35px 0;
  width: 513px;
}

.errors h3 {
  background: red;
  color: white;
  padding: 10px;
  font-size: 15px;
}

.errors ul li {
  list-style-type: none;
  margin: 0;
  padding: 8px 0 8px 10px;
  border-top: solid 1px pink;
  font-size: 12px;
  font-weight: 0.9;
}

button.delete {
  background: none !important;
  border: none;
  padding: 0 !important;
  margin-left: 10px;
  cursor: pointer;
  color: #236fff;
  font-size: 15px;
  font-weight: normal;
  margin: 3px 0 0 0;
  text-decoration: none;
}

button.delete:hover {
  text-decoration: underline;
}

h2 a {
  color: #236fff;
  font-size: 15px;
  font-weight: normal;
  margin: 3px 12px 0 12px;
  text-decoration: none;
}

h2 a:hover {
  text-decoration: underline;
}

.form-actions a {
  color: #236fff;
  font-size: 15px;
  margin: 3px 12px 0 12px;
  text-decoration: none;
}

.form-actions a:hover {
  text-decoration: underline;
}

input.search {
  width: 92%;
  margin: 15px 2px;
  padding: 4px 0 6px 6px;
}
Please note that these are all of the styles we will need in the app. Listing them all in one go is intended to keep the article a tad shorter.
Here, we’re using a small custom reset and the goodness of CSS grid for our layout. If you’re unfamiliar with CSS grid, there’s a good tutorial here: https://medialoot.com/blog/a-beginners-guide-to-css-grid-layout/
Import our styles in App.js:
import './App.css';
Next, add some markup to the <Editor> component:
render() {
  ...
  return (
    <div>
      <Header />
      <div className="grid">
        <EventList events={events} />
        <PropsRoute path="/events/:id" component={Event} event={event} />
      </div>
    </div>
  );
}
The <EventList> component:
render() {
  return (
    <section className="eventList">
      <h2>Events</h2>
      <ul>{this.renderEvents()}</ul>
    </section>
  );
}
And the <Event> component:
const Event = ({ event }) => (
  <div className="eventContainer">
    ...
  </div>
);
Now everything should be styled nicely.

Adding a Class to the Selected Event
Now it would be nice to add some kind of indication that a user has selected an event. This isn’t too tricky. In the <Editor> component pass in an activeID prop to the <EventList> component.
<EventList events={events} activeId={Number(eventId)} />
In the <EventList> component, use this to apply a class of active when rendering the list.
renderEvents() {
  const { activeId, events } = this.props;
  events.sort((a, b) => new Date(b.event_date) - new Date(a.event_date));

  return events.map(event => (
    <li key={event.id}>
      <Link to={`/events/${event.id}`} className={activeId === event.id ? 'active' : ''}>
        {event.event_date}
        {' - '}
        {event.event_type}
      </Link>
    </li>
  ));
}
...
EventList.propTypes = {
  activeId: PropTypes.number,
  events: PropTypes.arrayOf(PropTypes.object),
};

EventList.defaultProps = {
  activeId: undefined,
  events: [],
};
We already added some CSS styles for the active link, so when you now click on an event, the details should be displayed and the event should be highlighted accordingly.
Creating an Event
So far we have the Read functionality of our CRUD app. Now let’s add the ability to create an event.
Start off in the <Editor> component:
import React from 'react';
...
import { Switch } from 'react-router-dom';
import EventForm from './EventForm';

class Editor extends React.Component {
  ...

  render() {
    ...

    return (
      <div>
        <Header />
        <div className="grid">
          <EventList events={events} activeId={Number(eventId)} />
          <Switch>
            <PropsRoute path="/events/new" component={EventForm} />
            <PropsRoute path="/events/:id" component={Event} event={event} />
          </Switch>
        </div>
      </div>
    );
  }
}
Here, we’ve introduced a <Switch> component, which will render the first child <Route> that matches the location. This is practical, as we don’t want the new event form and the <Event> component to display at once.
We’ll add a link to display the form in the <EventList> component:
render() {
  return (
    <section className="eventList">
      <h2>
        Events
        <Link to="/events/new">New Event</Link>
      </h2>
      <ul>{this.renderEvents()}</ul>
    </section>
  );
}
Now, let’s create the <EventForm> component:
touch app/javascript/components/EventForm.js
And add the following content:
import React from 'react';

class EventForm extends React.Component {
  constructor(props) {
    super(props);

    this.handleSubmit = this.handleSubmit.bind(this);
  }

  handleSubmit(e) {
    e.preventDefault();
    console.log('submitted');
  }

  render() {
    return (
      <div>
        <h2>New Event</h2>
        <form className="eventForm" onSubmit={this.handleSubmit}>
          <div>
            <label htmlFor="event_type">
              <strong>Type:</strong>
              <input type="text" id="event_type" name="event_type" />
            </label>
          </div>
          <div>
            <label htmlFor="event_date">
              <strong>Date:</strong>
              <input type="text" id="event_date" name="event_date" />
            </label>
          </div>
          <div>
            <label htmlFor="title">
              <strong>Title:</strong>
              <textarea cols="30" rows="10" id="title" name="title" />
            </label>
          </div>
          <div>
            <label htmlFor="speaker">
              <strong>Speakers:</strong>
              <input type="text" id="speaker" name="speaker" />
            </label>
          </div>
          <div>
            <label htmlFor="host">
              <strong>Hosts:</strong>
              <input type="text" id="host" name="host" />
            </label>
          </div>
          <div>
            <label htmlFor="published">
              <strong>Publish:</strong>
              <input type="checkbox" id="published" name="published" />
            </label>
          </div>
          <div className="form-actions">
            <button type="submit">Save</button>
          </div>
        </form>
      </div>
    );
  }
}

export default EventForm;
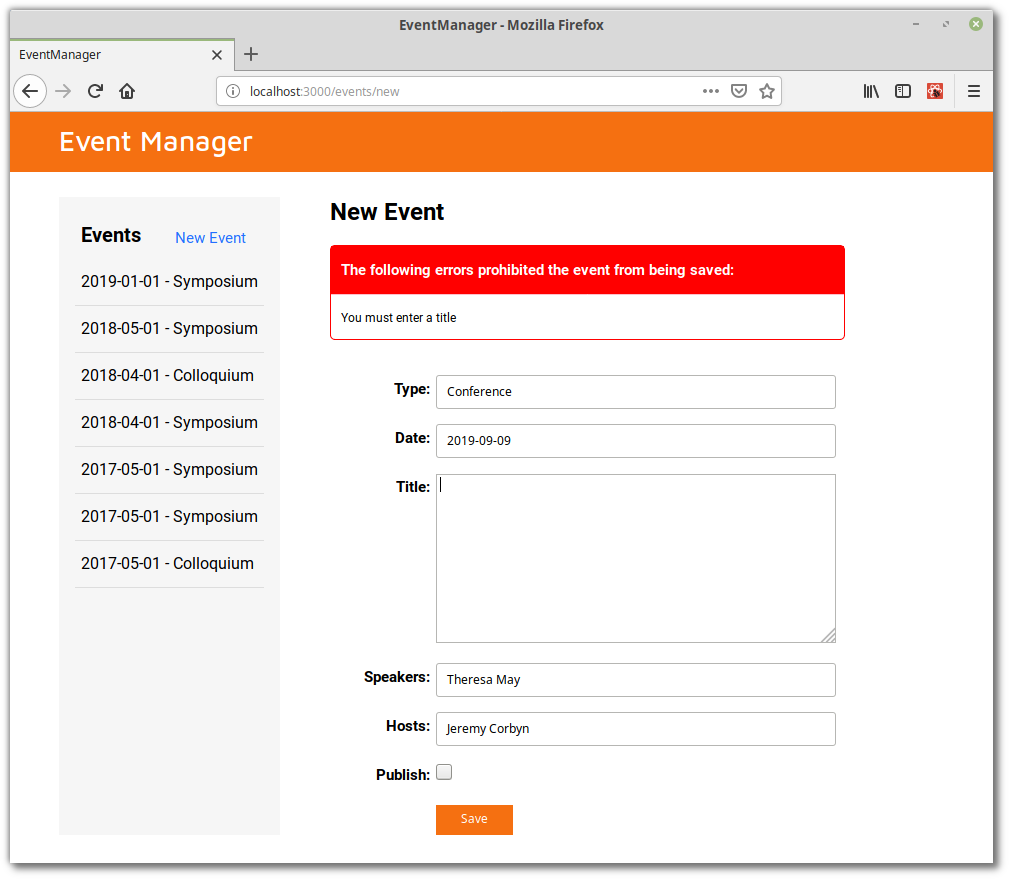
At this point the form should appear and when you click Save, it should log “Submitted” to the console.
Form Validation
Now, let’s add in some validation to make sure all of the fields (apart from published) are filled out. All of the action will take place in the <EventForm> component.
import React from 'react';
import PropTypes from 'prop-types';

class EventForm extends React.Component {
  constructor(props) {
    super(props);

    this.state = {
      event: props.event,
      errors: {},
    };

    this.handleSubmit = this.handleSubmit.bind(this);
    this.handleInputChange = this.handleInputChange.bind(this);
  }

  handleSubmit(e) {
    e.preventDefault();
    const { event } = this.state;
    const errors = this.validateEvent(event);
    if (!this.isEmptyObject(errors)) {
      this.setState({ errors });
    } else {
      console.log(event);
    }
  }

  validateEvent(event) {
    const errors = {};

    if (event.event_type === '') {
      errors.event_type = 'You must enter an event type';
    }

    if (event.event_date === '') {
      errors.event_date = 'You must enter a valid date';
    }

    if (event.title === '') {
      errors.title = 'You must enter a title';
    }

    if (event.speaker === '') {
      errors.speaker = 'You must enter at least one speaker';
    }

    if (event.host === '') {
      errors.host = 'You must enter at least one host';
    }

    console.log(event);
    return errors;
  }

  isEmptyObject(obj) {
    return Object.keys(obj).length === 0;
  }

  handleInputChange(event) {
    const { target } = event;
    const { name } = target;
    const value = target.type === 'checkbox' ? target.checked : target.value;

    this.setState(prevState => ({
      event: {
        ...prevState.event,
        [name]: value,
      },
    }));
  }

  renderErrors() {
    const { errors } = this.state;

    if (this.isEmptyObject(errors)) {
      return null;
    }

    return (
      <div className="errors">
        <h3>The following errors prohibited the event from being saved:</h3>
        <ul>
          {Object.values(errors).map(error => (
            <li key={error}>{error}</li>
          ))}
        </ul>
      </div>
    );
  }

  render() {
    return (
      <div>
        <h2>New Event</h2>
        {this.renderErrors()}
        <form className="eventForm" onSubmit={this.handleSubmit}>
          <div>
            <label htmlFor="event_type">
              <strong>Type:</strong>
              <input
                type="text"
                id="event_type"
                name="event_type"
                onChange={this.handleInputChange}
              />
            </label>
          </div>
          <div>
            <label htmlFor="event_date">
              <strong>Date:</strong>
              <input
                type="text"
                id="event_date"
                name="event_date"
                onChange={this.handleInputChange}
              />
            </label>
          </div>
          <div>
            <label htmlFor="title">
              <strong>Title:</strong>
              <textarea
                cols="30"
                rows="10"
                id="title"
                name="title"
                onChange={this.handleInputChange}
              />
            </label>
          </div>
          <div>
            <label htmlFor="speaker">
              <strong>Speakers:</strong>
              <input type="text" id="speaker" name="speaker" onChange={this.handleInputChange} />
            </label>
          </div>
          <div>
            <label htmlFor="host">
              <strong>Hosts:</strong>
              <input type="text" id="host" name="host" onChange={this.handleInputChange} />
            </label>
          </div>
          <div>
            <label htmlFor="published">
              <strong>Publish:</strong>
              <input
                type="checkbox"
                id="published"
                name="published"
                onChange={this.handleInputChange}
              />
            </label>
          </div>
          <div className="form-actions">
            <button type="submit">Save</button>
          </div>
        </form>
      </div>
    );
  }
}

EventForm.propTypes = {
  event: PropTypes.shape(),
};

EventForm.defaultProps = {
  event: {
    event_type: '',
    event_date: '',
    title: '',
    speaker: '',
    host: '',
    published: false,
  },
};

export default EventForm;
We start off by defining two properties on state: event and errors. The event property is taken from props (you’ll see why in a bit) and for now it is assigned some sensible defaults at the bottom of the file. The errors property is initialized as an empty object.
Within the render method, we add an onChange property to all our form inputs, which we bind to a new handleInputChange method. This method will update the event object we are holding in state, so that at any given time, this.state.event should mirror what has been entered into the form.
We can then expand our handleSubmit method to check for errors when the form is submitted. In our case, this will simply be that each field has a value. If any errors are detected, the error object that we are holding in state is updated and the errors are output to the page.
To perform the validation, we are relying on two further methods: validateEvent and isEmptyObject. If you have ESLint installed, you will see that it complains that:
Expected 'this' to be used by class method 'validateEvent'.
Expected 'this' to be used by class method 'isEmptyObject'.
This makes them good candidates to move into a helper module. Let’s create that now:
mkdir app/javascript/helpers
touch app/javascript/helpers/helpers.js
Now add the following code to helpers.js, making sure to remove validateEvent and isEmptyObject from the <EventForm> component:
export const isEmptyObject = obj => Object.keys(obj).length === 0;

export const validateEvent = (event) => {
  const errors = {};

  if (event.event_type === '') {
    errors.event_type = 'You must enter an event type';
  }

  if (event.event_date === '') {
    errors.event_date = 'You must enter a valid date';
  }

  if (event.title === '') {
    errors.title = 'You must enter a title';
  }

  if (event.speaker === '') {
    errors.speaker = 'You must enter at least one speaker';
  }

  if (event.host === '') {
    errors.host = 'You must enter at least one host';
  }

  return errors;
}
And adjust in the <EventForm> component.
import { isEmptyObject, validateEvent } from '../helpers/helpers';

handleSubmit(e) {
  e.preventDefault();
  const { event } = this.state;
  const errors = validateEvent(event);
  if (!isEmptyObject(errors)) {
    this.setState({ errors });
  } else {
    console.log(event);
  }
}

renderErrors() {
  const { errors } = this.state;

  if (isEmptyObject(errors)) {
    return null;
  }
  ...
}
Now when you attempt to submit a form which is not properly filled out, you should see some nicely formatted errors.
Making the Date Field a Datepicker
The next thing to do is to wire up our date field as a datepicker. For this we’ll use Pikaday.
First, we need to install the library from npm:
yarn add pikaday
Then in the <EventForm> component, import the library:
import Pikaday from 'pikaday';
import 'pikaday/css/pikaday.css';
And change the date field like so:
<div>
  <label htmlFor="event_date">
    <strong>Date:</strong>
    <input
      type="text"
      id="event_date"
      name="event_date"
      ref={this.dateInput}
      autoComplete="off"
    />
  </label>
</div>
As you notice, we are creating a ref on the input so we can reference it elsewhere in the code.
In the constructor add:
this.dateInput = React.createRef();
You can read more about refs here: https://reactjs.org/docs/refs-and-the-dom.html
Now, in the componentDidMount lifecycle hook, we need to initialize Pikaday:
componentDidMount() {
  new Pikaday({
    field: this.dateInput.current,
    onSelect: (date) => {
      const formattedDate = formatDate(date);
      this.dateInput.current.value = formattedDate;
      this.updateEvent('event_date', formattedDate);
    },
  });
}
Thanks to our ref, the field property of the configuration object that we are passing to Pikaday’s constructor, points to DOM element we want to turn into a datepicker. The onSelect method determines what will happen when the user selects a date. In this case, the date is formatted into a YYYY-MM-DD string and the event object we are holding in state is updated.
We can write the formatDate function as a helper method in app/javascript/helpers/helpers.js. This receives a Date object and returns a YYYY-MM-DD string.
export const formatDate = (d) => {
  const YYYY = d.getFullYear();
  const MM = `0${d.getMonth() + 1}`.slice(-2);
  const DD = `0${d.getDate()}`.slice(-2);

  return `${YYYY}-${MM}-${DD}`;
};
Don’t forget to import it in the <EventForm> component:
import { formatDate, isEmptyObject, validateEvent } from '../helpers/helpers';
We can declare the updateEvent method in the <EventForm> component:
updateEvent(key, value) {
  this.setState(prevState => ({
    event: {
      ...prevState.event,
      [key]: value,
    },
  }));
}
We can also use this to dry up our handleInputChange method:
handleInputChange(event) {
  const { target } = event;
  const { name } = target;
  const value = target.type === 'checkbox' ? target.checked : target.value;
  this.updateEvent(name, value);
}
And that’s it. We now have a datepicker.
Ref.: https://stackoverflow.com/questions/30058477/how-can-i-use-pikaday-with-reactjs
Warning in Webpack Console
At the time of writing, the current version of Pikaday is 1.8.0 and this version will cause two warnings to be shown in the webpack console.
WARNING in ./node_modules/pikaday/pikaday.js 28:17-24
Critical dependency: the request of a dependency is an expression

WARNING in ./node_modules/pikaday/pikaday.js
Module not found: Error: Can't resolve 'moment' in '/home/jim/files/Web design/React/react-event-manager/next/node_modules/pikaday'
The first is caused by the way Pikaday includes the Moment library, which it has now made an optional dependency. You can read more about this here and here.
The second is caused by Pikaday having made Moment an optional dependency. You can read more about this here.
If the warnings bother you, you can get rid of them by commenting out the Moment requires in node_modules/pikaday/pikaday.js:
(function (root, factory)
{
    'use strict';

    var moment;
    if (typeof exports === 'object') {
        // CommonJS module
        // Load moment.js as an optional dependency
        // try { moment = require('moment'); } catch (e) {}
        module.exports = factory(moment);
    } else if (typeof define === 'function' && define.amd) {
        // AMD. Register as an anonymous module.
        define(function (req)
        {
            // Load moment.js as an optional dependency
            var id = 'moment';
            // try { moment = req(id); } catch (e) {}
            return factory(moment);
        });
    } else {
        root.Pikaday = factory(root.moment);
    }
}(this, function (moment)
However, these issues are on the roadmap to be fixed in Pikaday version 2.0 and messing around with code in the node_modules folder isn’t the best idea, so for now I’m going to ignore them.
Saving an Event
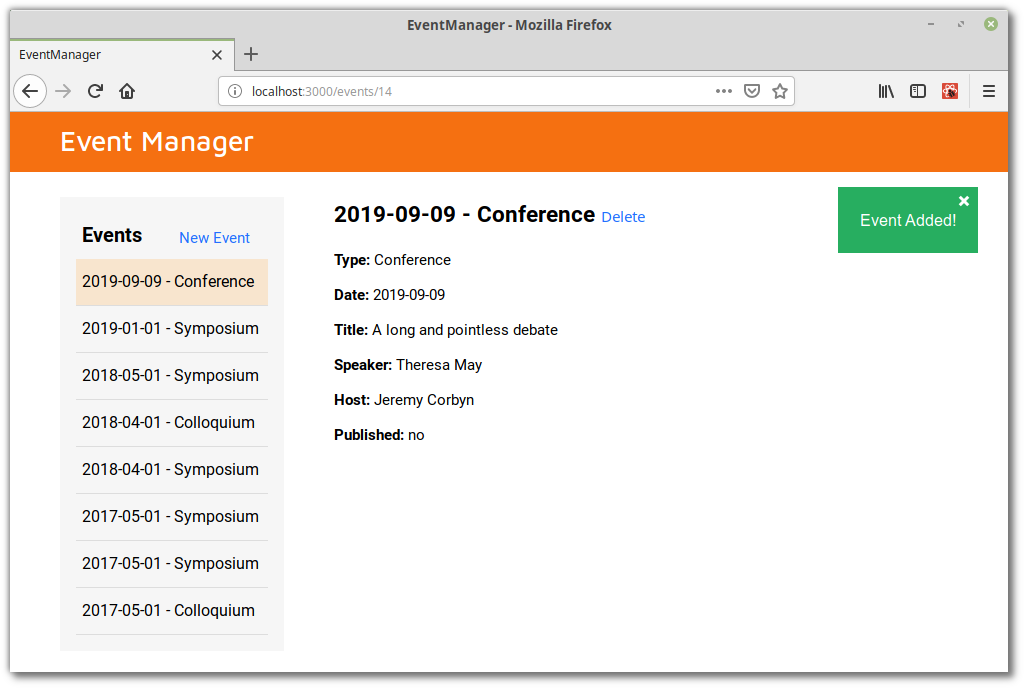
To actually save an event to the database, we’re going to pass a callback function to our <EventForm> component, that can be called in the context of its parent.
In the <Editor> component:
class Editor extends React.Component {
  constructor(props) {
    ...
    this.addEvent = this.addEvent.bind(this);
  }

  componentDidMount() { ... }

  addEvent(newEvent) {
    axios
      .post('/api/events.json', newEvent)
      .then((response) => {
        alert('Event Added!');
        const savedEvent = response.data;
        this.setState(prevState => ({
          events: [...prevState.events, savedEvent],
        }));
        const { history } = this.props;
        history.push(`/events/${savedEvent.id}`);
      })
      .catch((error) => {
        console.log(error);
      });
  }

  render() {
    ...

    return (
      <div>
        <Header />
        <div className="grid">
          <EventList events={events} activeId={Number(eventId)} />
          <Switch>
            <PropsRoute path="/events/new" component={EventForm} onSubmit={this.addEvent} />
            <PropsRoute path="/events/:id" component={Event} event={event} />
          </Switch>
        </div>
      </div>
    );
  }
}

Editor.propTypes = {
  match: PropTypes.shape(),
  history: PropTypes.shape({ push: PropTypes.func }).isRequired,
};
As you can see, we have defined an addEvent method, which receives a newEvent object and then fires off a request to our API to create a new event using that data. If the request is successful, it will add the newly created event to the array of events that are being held in state and the UI will update accordingly. It will also use the history object, which is made available to us by React Router, to change the URL to that of the newly created event.
Note also that we are passing the addEvent method into the EventForm component as a callback. Now, all we’ve got to do is call it in our <EventForm> component:
handleSubmit(e) {
  e.preventDefault();
  const { event } = this.state;
  const errors = validateEvent(event);

  if (!isEmptyObject(errors)) {
    this.setState({ errors });
  } else {
    const { onSubmit } = this.props;
    onSubmit(event);
  }
}
...
EventForm.propTypes = {
  event: PropTypes.shape(),
  onSubmit: PropTypes.func.isRequired,
};
Now, when you attempt to save an event to the database, you should get an alert pop up, informing you that the save was successful. If you’re following along, I’d encourage you to give this a try and satisfy yourself that everything is working before continuing.
Deleting Events
Now, if you’re anything like me, you will have created a bunch of silly events while following along with this tutorial. Let’s add a delete button so that we can nuke them.
As with adding an event, we’ll want to declare a method to delete an event in our <Editor> component and pass it to our <Event> component as a prop.
First the method:
class Editor extends React.Component {
  constructor(props) {
    ...
    this.deleteEvent = this.deleteEvent.bind(this);
  }
  ...
  deleteEvent(eventId) {
    const sure = window.confirm('Are you sure?');
    if (sure) {
      axios
        .delete(`/api/events/${eventId}.json`)
        .then((response) => {
          if (response.status === 204) {
            alert('Event deleted');
            const { history } = this.props;
            history.push('/events');

            const { events } = this.state;
            this.setState({ events: events.filter(event => event.id !== eventId) });
          }
        })
        .catch((error) => {
          console.log(error);
        });
    }
  }
}
In out deleteEvent method, we ask the user for confirmation that they really want to delete the event via a confirm dialogue. If the user is sure, we send a DELETE request to our API and once a successful response comes back, we inform the user that the event has been deleted, redirect the user to /events and remove the deleted event from state. As with the addEvent method, if the response from the API is anything other than success, we log the error to the console.
Next, pass the deleteEvent callback to the <Event> component:
<PropsRoute
  path="/events/:id"
  component={Event}
  event={event}
  onDelete={this.deleteEvent}
/>
Now, in the <Event> component we can create a button to delete the event:
const Event = ({ event, onDelete }) => (
  <div className="eventContainer">
    <h2>
      {event.event_date}
      {' - '}
      {event.event_type}
      {' '}
      <button className="delete" type="button" onClick={() => onDelete(event.id)}>
        Delete
      </button>
    </h2>
    ...
  </div>
);


Event.propTypes = {
  event: PropTypes.shape(),
  onDelete: PropTypes.func.isRequired,
};
And now we can delete events.
Adding Flash Messages
Alerts are all well and good to tell the user that something happened, but they don’t look very pretty. Let’s add flash message functionality instead, using the react-s-alert library.
yarn add react-s-alert
We’ll stick this functionality in its own helper file, notifications.js.
touch app/javascript/helpers/notifications.js
Then add:
import Alert from 'react-s-alert';
import 'react-s-alert/dist/s-alert-default.css';
import 'react-s-alert/dist/s-alert-css-effects/scale.css';

// Uncomment as needed
// import 'react-s-alert/dist/s-alert-css-effects/slide.css';
// import 'react-s-alert/dist/s-alert-css-effects/bouncyflip.css';
// import 'react-s-alert/dist/s-alert-css-effects/flip.css';
// import 'react-s-alert/dist/s-alert-css-effects/genie.css';
// import 'react-s-alert/dist/s-alert-css-effects/jelly.css';
// import 'react-s-alert/dist/s-alert-css-effects/stackslide.css';

const defaults = {
  position: 'top-right',
  effect: 'scale',
  timeout: 3500,
  offset: 45,
};

export { Alert };

export const success = (message, options = {}) => {
  Alert.success(message, Object.assign(defaults, options));
};

export const info = (message, options = {}) => {
  Alert.info(message, Object.assign(defaults, options));
};

export const warning = (message, options = {}) => {
  Alert.warning(message, Object.assign(defaults, options));
};

export const error = (message, options = {}) => {
  Alert.error(message, Object.assign(defaults, options));
};
Now we have a centralized place to set some sensible defaults and can reduce the boilerplate when calling the flash messages. You’ll also notice that I’m including the scale effect to animate the display of the messages. Note that there are a whole bunch of other effects which can be tried out by uncommenting the appropriate line and altering the default options accordingly.
Next, include the library in the <App> component:
import React from 'react';
import { Route } from 'react-router-dom';
import { Alert } from '../helpers/notifications';
import Editor from './Editor';
import './App.css';

const App = () => (
  <div>
    <Route path="/events/:id?" component={Editor} />
    <Alert stack={ { limit: 3 } } />
  </div>
);

export default App;
And use it in the <Editor> component to replace our alerts:
import { success } from '../helpers/notifications';
...
addEvent(newEvent) {
  axios
    .post('/api/events.json', newEvent)
    .then((response) => {
      success('Event Added!');
      ...
}

deleteEvent(eventId) {
  const sure = window.confirm('Are you sure?');
  if (sure) {
    axios
      .delete(`/api/events/${eventId}.json`)
      .then((response) => {
        if (response.status === 204) {
          success('Event deleted');
          ...
  }
}
While we’re at it we can move the error handling into a helper method, too. In app/javascript/helpers/helpers.js:
import { error } from './notifications';
...
export const handleAjaxError = (err) => {
  error('Something went wrong');
  console.warn(err);
};
And in the <Editor> component:
import { handleAjaxError } from '../helpers/helpers';
And replace the three occurences of:
.catch((error) => {
  console.log(error);
});
With:
.catch(handleAjaxError);
Now, when you create or delete an event, you should get a nicely styled flash message.
Updating an Event
The final piece of our CRUD functionality to add is the ability to update an event. Remember when we declared an event as props in our <EventForm> component? Well, this enables us to re-use the same form to update an event — if we pass an event into the component as props, the event details should pre-populate the form, otherwise the component falls back to its sensible defaults, which are exactly what we need to create a new event.
Let’s start by adding the Edit link to the <Event> component. It’s fine to make this a link, as it will change the URL:
import { Link } from 'react-router-dom';
...
<h2>
  {event.event_date}
  {' - '}
  {event.event_type}
  {' '}
  <Link to={`/events/${event.id}/edit`}>Edit</Link>
  <button className="delete" type="button" onClick={() => onDelete(event.id)}>
    Delete
  </button>
</h2>
In the <Editor> component, let’s add the updateEvent method, bind it to the component instance and pass it as a prop to the <EventForm> component:
class Editor extends React.Component {
  constructor(props) {
    ...
    this.updateEvent = this.updateEvent.bind(this);
  }
  ...
  updateEvent(updatedEvent) {
    axios
      .put(`/api/events/${updatedEvent.id}.json`, updatedEvent)
      .then(() => {
        success('Event updated');
        const { events } = this.state;
        const idx = events.findIndex(event => event.id === updatedEvent.id);
        events[idx] = updatedEvent;
        const { history } = this.props;
        history.push(`/events/${updatedEvent.id}`);
        this.setState({ events });
      })
      .catch(handleAjaxError);
  }
  ...
  render() {
    ...
    return (
      <div>
        ...
          <Switch>
            <PropsRoute path="/events/new" component={EventForm} onSubmit={this.addEvent} />
            <PropsRoute
              exact
              path="/events/:id/edit"
              component={EventForm}
              event={event}
              onSubmit={this.updateEvent}
            />
            <PropsRoute
              path="/events/:id"
              component={Event}
              event={event}
              onDelete={this.deleteEvent}
            />
          </Switch>
        ...
      </div>
    );
  }
}
Note that the route order is important, as otherwise path="/events/:id" will match first and the form won’t be displayed.
Finally, in the <EventForm> component, we need to pull the event out of state and set the values in the form accordingly.
render() {
  const { event } = this.state;

  return (
    <div>
      <h2>New Event</h2>
      {this.renderErrors()}
      <form className="eventForm" onSubmit={this.handleSubmit}>
        <div>
          <label htmlFor="event_type">
            <strong>Type:</strong>
            <input
              type="text"
              id="event_type"
              name="event_type"
              onChange={this.handleInputChange}
              value={event.event_type}
            />
          </label>
        </div>
        <div>
          <label htmlFor="event_date">
            <strong>Date:</strong>
            <input
              type="text"
              id="event_date"
              name="event_date"
              ref={this.dateInput}
              autoComplete="off"
              value={event.event_date}
              onChange={this.handleInputChange}
            />
          </label>
        </div>
        <div>
          <label htmlFor="title">
            <strong>Title:</strong>
            <textarea
              cols="30"
              rows="10"
              id="title"
              name="title"
              onChange={this.handleInputChange}
              value={event.title}
            />
          </label>
        </div>
        <div>
          <label htmlFor="speaker">
            <strong>Speakers:</strong>
            <input
              type="text"
              id="speaker"
              name="speaker"
              onChange={this.handleInputChange}
              value={event.speaker}
            />
          </label>
        </div>
        <div>
          <label htmlFor="host">
            <strong>Hosts:</strong>
            <input
              type="text"
              id="host"
              name="host"
              onChange={this.handleInputChange}
              value={event.host}
            />
          </label>
        </div>
        <div>
          <label htmlFor="published">
            <strong>Publish:</strong>
            <input
              type="checkbox"
              id="published"
              name="published"
              onChange={this.handleInputChange}
              checked={event.published}
            />
          </label>
        </div>
        <div className="form-actions">
          <button type="submit">Save</button>
        </div>
      </form>
    </div>
  );
}
We also need to pass the datepicker a toString function in its initial configuration, so that the date is formatted properly when the event date is added to the form:
componentDidMount() {
  new Pikaday({
    field: this.dateInput.current,
    toString: date => formatDate(date),
    onSelect: (date) => {
      const formattedDate = formatDate(date);
      this.dateInput.current.value = formattedDate;
      this.updateEvent('event_date', formattedDate);
    },
  });
}
And finally, we need to hook into the componentWillReceiveProps lifecycle method to ensure that the fields are cleared when a user is editing an event, then clicks New Event.
componentWillReceiveProps({ event }) {
  this.setState({ event });
}
And that’s that. We now have all of our CRUD functionality.
Adding Some Form Tweaks
Next, let’s add a Cancel button to the form (in case the user changes their mind whilst editing or creating an event). We’ll also change the title of the form to reflect which action they are performing. And while we’re at it, we’ll improve the validation for our date field — at the moment it just checks if the user has entered a value.
In the <EventForm> component:
import { Link } from 'react-router-dom';

render() {
  const { event } = this.state;
  const cancelURL = event.id ? `/events/${event.id}` : '/events';
  const title = event.id ? `${event.event_date} - ${event.event_type}` : 'New Event';

  return (
    <div>
      <h2>{title}</h2>

      {this.renderErrors()}

      <form className="eventForm" onSubmit={this.handleSubmit}>
        ...
        <div className="form-actions">
          <button type="submit">Save</button>
          <Link to={cancelURL}>Cancel</Link>
        </div>
      </form>
    </div>
  );
}
And the date validation in helpers.js:
const isValidDate = dateObj => !Number.isNaN(Date.parse(dateObj));

export const validateEvent = (event) => {
  ...

  if (!isValidDate(event.event_date)) {
    errors.event_date = 'You must enter a valid date';
  }

 ...

  return errors;
};
Adding Search
It’d be nice to add search functionality to the events list. Luckily this is not complicated as we are holding all the events in state.
Let’s start off by adding a search input in our <EventList> component:
render() {
  return (
    <section className="eventList">
      <h2>
        Events
        <Link to="/events/new">New Event</Link>
      </h2>

      <input
        className="search"
        placeholder="Search"
        type="text"
        ref={this.searchInput}
        onKeyUp={this.updateSearchTerm}
      />

      <ul>{this.renderEvents()}</ul>
    </section>
  );
}
Notice that we have added a ref to the input element, so that we can reference it within our component. Now let’s create that ref and declare a searchTerm property in state.
class EventList extends React.Component {
  constructor(props) {
    super(props);
    this.state = {
      searchTerm: '',
    };

    this.searchInput = React.createRef();
    this.updateSearchTerm = this.updateSearchTerm.bind(this);
  }

  updateSearchTerm() {
    this.setState({ searchTerm: this.searchInput.current.value });
  }
  ...
}
We’re also creating a updateSearchTerm method which will be called every time a key press is registered on the search field.
The list of events is rendered in the renderEvents method. Let’s apply a filter to our event list, so that only events matching the search criteria are displayed:
renderEvents() {
  const { activeId, events } = this.props;
  const filteredEvents = events
    .filter(el => this.matchSearchTerm(el))
    .sort((a, b) => new Date(b.event_date) - new Date(a.event_date));

  return filteredEvents.map(event => (
    ...
  ));
}
And finally, we need the matchSearchTerm method:
matchSearchTerm(obj) {
  const {
    id, published, created_at, updated_at, ...rest
  } = obj;
  const { searchTerm } = this.state;

  return Object.values(rest).some(
    value => value.toLowerCase().indexOf(searchTerm.toLowerCase()) > -1,
  );
}
Here, we are excluding some database fields that were returned by the original Ajax call, but which we are not interested in filtering by.
Et voilà! We have search.
Adding a 404 Component
The last thing we will do is add a component to render when an event is not found. This might be useful if a user has bookmarked an event which has since been deleted.
First, create the new component:
touch app/javascript/components/EventNotFound.js
And add the content. Nothing exciting here:
import React from 'react';

const EventNotFound = () => <p>Event not found!</p>;

export default EventNotFound;
Now we need to update the <Event> component:
import EventNotFound from './EventNotFound';

const Event = ({ event, onDelete }) => {
  if (!event) return <EventNotFound />;

  return ( ... );
};
And finally, the <EventForm> component:
import EventNotFound from './EventNotFound';

class EventForm extends React.Component {
  ...
  render() {
    const { event } = this.state;
    const { path } = this.props;

    if (!event.id && path === '/events/:id/edit') return <EventNotFound />;

    const cancelURL = event.id ? `/events/${event.id}` : '/events';
    const title = event.id ? `${event.event_date} - ${event.event_type}` : 'New Event';

    return ( ... );
  }
}

EventForm.propTypes = {
  event: PropTypes.shape(),
  onSubmit: PropTypes.func.isRequired,
  path: PropTypes.string.isRequired,
};
Now if the user attempts to view or edit a non-existent event, they will be shown a 404 component.
Conclusion
And that’s everything. Well done if you’ve made it up to here. You should now have a fully functioning React/Rails CRUD app.
I hope this tutorial has helped somebody, I’d be glad to hear your comments in the discussion below.
Comments