I have an old Sony XPeria S phone (from 2012) which has long since been abandoned by my carrier. It no longer receives any updates and is stuck on Android 4.2, which kinda sucks….
So I decided to take matters into my own hands and get an up-to-date version of Android, by flashing the phone with a custom ROM. While this didn’t prove to be that difficult, I did hit a few stumbling blocks along the way, which I wanted to document.
This post will serve two purposes. Firstly, it will provide detailed instructions on how to install a custom ROM on an Xperia S. Secondly, it will also outline the general process of flashing an old Android phone and offer a high-level overview of the concepts involved.
But Why?
The big motivational factors for me wanting to do this were:
- The environmental impact of producing new smartphones is not negligible. Why should I be forced to buy a new phone every two years when an old one will serve me just as well?
- New smartphones come loaded with bloatware which cannot be uninstalled. This ranges from the manufacturer’s own software, to 3rd party apps (e.g. Amazon, Facebook) which come bundled with the phone. Removing these apps can increase battery life and reduce your attack surface.
- The amount of data Google collects about its users is frightening. By installing a custom ROM, you can massively reduce Google’s data collection on your mobile device.
- Running an unsupported Android version is a security risk. If you chose a custom ROM that is under active development, your old phone will still receive security updates.
And Why Not?
It’s also important to consider why this might not be the best idea.
- To install a custom ROM, you will have to unlock your phone’s bootloader. This could void your phone’s warranty.
- Unlocking the bootloader will perform a factory reset of your phone. This means you will lose any data which is not backed up.
- You have no guarantee of success. If the process goes wrong, it is possible to make the phone unusable.
- Security. Looking at this from a different angle, you will ultimately be downloading your phone’s new operating system from a file sharing site somewhere on the internet. Take a second to think about that.
For anyone who is unsure what they are doing, please read the tutorial through to the end. Do not start issuing random commands to your device without understanding what they do. I am in no way responsible if you brick your phone.
And with that said, let’s get to it…
The General Principles
For this process to work, you’ll need to do the following:
- Find a custom ROM to install
- Install the Android SDK Platform-Tools
- Unlock the device’s bootloader
- Install a custom recovery image
- Use the recovery image to install the ROM
You’ll also need to connect your device to your PC, so have a suitable USB cable handy. And please note that I am using Linux. The process will differ slightly if you are using Windows, but the principles are similar.
So What Is a ROM?
ROM stands for Read-Only Memory — a storage medium whose data may only be read. An example of a ROM would be a cartridge used in a video game console.
In terms of smartphones, the phrase has taken on a slightly different meaning, namely: an image of an operating system that you install into the ROM area of your phone.
There are two common kinds of ROM. A stock ROM is the version of the operating system which comes with the phone, whereas a custom ROM is a version of the operating system which has been modified in some way.
It is possible to mod Android, because Android is open source. This means that any developer can edit the code, recompile it, and re-release it for people to install.
Finding a Custom ROM
Custom ROMs are device specific. This means you have to find one which has been tailored to your device. You cannot just grab the first one that takes your fancy.
A great place to visit when looking for a custom ROM (or anything else Android related) is the XDA-Developers Forum. This is a site where Android developers and users hang out to exchange ideas, apps, resources etc.
When you first arrive, you can enter your device into the device finder at the top of the page. I was happy to see that the Xperia S has its own forum where I soon discovered the nAOSP 8.1 Oreo ROM on offer. Note that “ASOP” stands for Android Open Source Project (the open-source version of Android I mentioned above) and that the “n” stands for “near”. 8.1 is the Android version number and “Oreo” is the version name.
Cool! So I was good to go with a ROM. This would be a significant leap from the crappy 4.2 version I had been stuck on.
Unlocking the Bootloader
On a PC, a bootloader is a program that starts whenever a device is powered on, so as to ensure the right operating system is activated. For example, maybe you installed Windows and Linux on the same machine and the PC needs to know which one to boot into.
The same principle applies to an Android phone, except the bootloader determines when to run Android and when to enter recovery mode. You need to unlock the bootloader, so as to be able to install a custom recovery image and a custom ROM.
Returning to the Xperia, a quick Google search brought me to the official instructions on the Sony site. I’ll go through the steps I followed below.
Check If the Bootloader Can Be Unlocked
As it is only possible to unlock the bootloader for certain releases, I needed to verify that the bootloader on my device could be unlocked.
To do this, I had to open the dialer and enter *#*#7378423#*#* to access the service menu.
Then, I had to tap Service info > Configuration > Rooting Status.
Happily, this said “Yes”
Install Android SDK Platform-Tools
As can be read on the project’s website, Android SDK Platform-Tools is a component for the Android SDK. It includes tools that interface with the Android platform, such as adb and fastboot. These tools are required if you want to unlock your device’s bootloader and flash it with a new system image.
I downloaded the correct version of the tools (SDK Platform-Tools for Linux) from the page above and unpacked it to my home directory. I then entered the platform-tools directory and added the adb and fastboot programs to my $PATH.
Finally, I needed to enable USB debugging on my Xperia. This could be done by tapping on Settings > About Phone > Build Version multiple times, after which I could turn it on via Settings > Developer options.
Connect to Fastboot
Fastboot is a tool/protocol for writing data directly to your phone’s flash memory. To boot the phone into fastboot mode, I needed to connect it to the PC via USB, then issue the following command:
adb reboot bootloader
The light in the top left-hand corner of the device changed from green to blue to indicate that the device was in fastboot mode.
Next I entered:
sudo fastboot devices
And confirmed that my device was listed here by its serial number.
Obtain an Unlock Key
This step will void your warranty and delete your data! If this worries you, check out this post on making a TA backup, which should let you tamper with your device, without worrying about the warranty.
To complete the final step I needed my phone’s IMEI number. IMEI stands for International Mobile Station Equipment Identity and is a unique set of numbers and letters that identifies the device.
To obtain the IMEI number, I needed to dial *#06#, then make a note of what was displayed.
Next, I had to head over to the Sony’s Unlock Bootloader page, select my device and enter the IMEI number I had just jotted down. Having done that, the website returned my unlock code.
Finally, back in the terminal, I had to enter:
sudo fastboot oem unlock 0x<unlock code>
At this point, the phone disconnected and took a while to boot back up. When it did, it was completely wiped and started setting Android up for the first use.
And the bootloader was unlocked.
Installing a Custom Recovery
The thread in which I found the ROM links to additional instructions for installing it. Chief among them is:
This build must be flashed from the latest version of TWRP (3.2.3).
TWRP is short for Team Win Recovery Project and is an open-source custom recovery image for Android-based devices. TWRP is a powerful tool that allows users to install third-party firmware (i.e. custom ROMs) and back up the current system. These features are normally unsupported by stock recovery images.
As with custom ROMs, the version of TWRP that you install will depend upon the phone you are installing it onto. In my case, I chose the latest version of TWRP for Sony Xperia S. If you are following along here, please make sure that you select the correct version of TWRP for your device.
Installation Woes
Unfortunately for me, this was the trickiest step in the process and it cost me a fair deal of time. Originally, I had been following this guide on the XDA-Developers forums, which states that once your phone is connected to your PC in fastboot, you can flash your phone’s recovery with the following command:
sudo fastboot flash recovery twrp-3.2.3-nozomi.img
I ran this command, but annoyingly it errored out with the following message:
Sending 'recovery' (12964 KB)
(bootloader) USB download speed was 33272kB/s
OKAY [  0.415s]
Writing 'recovery'
(bootloader) Flash of partition 'recovery' requested
FAILED (remote: 'Partition not found')
Finished. Total time: 0.437s
It seems that the reason for this is that Sony Xperia S phones, don’t have a dedicated recovery partition, rather a recovery-in-boot arrangement, which means that the recovery is booted using the regular kernel/boot image on the device.
The next method I tried was listed on the TWRP for Sony Xperia S page linked to above (it might have been a good idea to read that first time around). This saw me rename the TWRP image to twrp.img, then copy it to the root of the phone’s /sdcard folder like so:
mv twrp-3.2.3-nozomi.img twrp.img
adb push twrp.img /sdcard
Then open an adb shell and use dd to copy it to the correct location on the device:
adb shell
shell@android:/ $ su
root@android:/ # dd if=/sdcard/twrp.img of=/dev/block/mmcblk0p11

25929+1 records in
25929+1 records out
This seemed to work, i.e. I didn’t get an error message, but try as I liked, I could not get the phone to boot into the custom recovery. Meh!
What Else Didn’t Work
At this point I started Googling, but to no avail. There are a heap of tutorials out there on how to flash the Xperia S with a custom ROM (here are some examples), but they are either outdated, assume TWRP is already installed, or tell you to use one of the methods listed above that didn’t work.
I then attempted to use the official TWRP App to install TWRP from within Android. I followed the instructions in this video, but when it came to selecting the downloaded image to flash, I didn’t have the option. The app also reported Can't find recovery — indicating the previous error was causing it to fail.
The TWRP app requires you to root your phone. To do this I headed over to the TowelRoot site, where I clicked the big red lambda (λ) to download
tr.apk, then ranadb install tr.apkto install the app. I turned on the phone’s Wi-Fi (apparently, the app needs it to check if the phone is rootable), opened the app on the phone and that was it.
Next I tried TWRP Manager which does more or less the same thing as the official TWRP app above. During installation, this pulled in something called Busybox (which was good to know about). I followed this video to install TWRP from within Android, but again (frustratingly), it failed when it came to the download. So, no dice..
I then saw ROM Manager recommended as an alternative to TWRP. The official website is http://clockworkmod.com/ and you can click through to ROM manager in the Play Store from there. I watched the official video (on that page), installed ROM manager, but when I went to install the Clockwork Mod recovery from within the app, it told me that my phone wasn’t supported.
Finally, I tried to install the Clock Work Mod (CWM) recovery directly. This thread on XDA-Developers forum looked promising, but all the links were dead. I also tried following this tutorial, but it relied on the missing file from the thread above.
What Did Work
By this point, I had a sinking feeling that everything I tried was doomed to failure. Then, I ran across a LineageOS page that said:
Temporarily flash TWRP to boot:
fastboot flash boot twrp-x.x.x-x-huashan.img
I had read that TWRP should not be flashed to boot, but by now I was out of options with nothing to really lose. So I did:
sudo fastboot flash boot twrp-3.2.3-nozomi.img
This worked (in that the command ran without errors) and I tentatively restarted the phone. Once it booted back up again, the first thing I noticed was that the light in the top left corner turned pink. It hadn’t done that before, so I pressed Volume up a couple of times, and I was in to the recovery. Yay!
Eager to test the next step, I booted back into fastboot and moved the custom ROM to the phone:
sudo fastboot reboot
adb push nAOSProm-8.1.0-b06-nozomi.zip /sdcard
Then, I could jump back into TWRP (as described above) and select Install > nAOSProm-8.1.0-b06-nozomi.zip > Swipe to Confirm Flash to install the custom ROM.
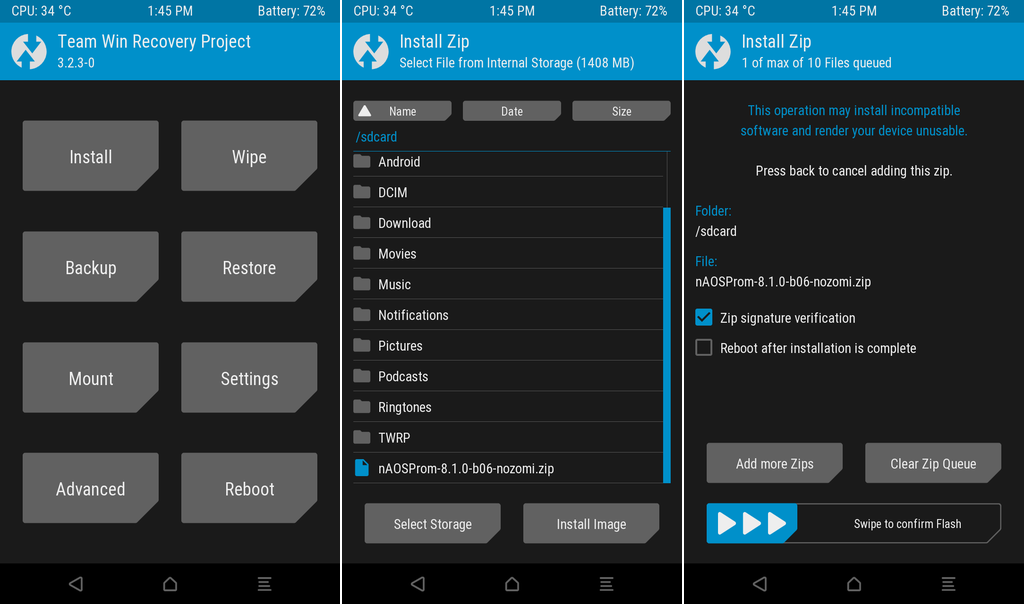
A progress bar showed on TWRP for a while, then the phone rebooted. It took ages to come back to life, but when it did, it was up and running with Android Oreo 8.1!
Installing Open-Source Apps with F-Droid
The ROM came with only a handful of apps installed, so one of the first things I did with the new OS was to install F-Droid. This is a community-maintained software repository for Android, similar to the Google Play store. The main repository, hosted by the project, contains only free, libre software apps.
Installing F-Droid is simple. You can download it from the official F-Droid website. Then, locate the downloaded apk file on your device and tap it to install. You will be prompted to allow Android to install an app form an unknown source. Agree to this and you’re good to go.
Once you open F-Droid, you will see that the apps are organized into categories, such as Connectivity, Development, Games and so on. There is a reasonably good selection of apps out of the box, but you can expand this by installing additional repos, many of which are listed here. You can read how to add a repo to F-Droid here.
If you’re looking for inspiration on what top install, check out this post where the author lists his favourite F-Droid apps.
But I Can’t Live Without <insert-app-here>
Personally speaking, I’m happy to keep Google off of my phone as much as possible, but if you really need apps out of the Play Store, or any of the proprietary Google-branded applications that come pre-installed with most Android devices, there are a couple of possibilities.
The most lightweight option is an app called Aurora Store which can be downloaded via F-Droid. This lets you download apps directly from Google Play Store as apk files which you can then install.
The second option is to install something called Open GApps. This will allow you to add part, or all of Google’s suite of apps (such as Google Play Services, Play Store, Gmail, Maps, etc) back to your phone. You can hover your mouse over the different packages on the project’s home page to see what each variant offers. You will also have to choose the correct platform and Android version before you can download. If you’re not sure what to select, the project has its own app, which will detect which version of Android you’re running and which architecture the apps need to be built for.
Open GApps on the Xperia S
I was curious to see if I could get Google Play working on the Xperia S and this is how I went.
In the original thread on the XDA-Developers forum, the ROM dev was saying that Open GApps Arm 8.1 Micro was a good choice, so I downloaded this and pushed it to the phone:
adb push open_gapps-arm-8.1-micro-20190225.zip /sdcard
I then hopped into TWRP and installed it using the same method as outlined above. When I restarted the phone, the apps were there, but when I started Google Play, I kept repeatedly getting the message “Play service stopped working”.
I then tried to uninstall GApps using this tool and rendered the OS unusable. Oh dear!
Going back to square one, I then wiped the device from within TWRP (advanced wipe including the system). I then pushed the custom ROM to the device, downloaded GApps Arm > 8.1 > Pico and pushed that to the device, too. Pico contains the bare minimum to get Google Play functionality.
From within TWRP, I clicked Install, then selected first the custom ROM, then the GApps file. TWRP installed them one after another and rebooted the phone.
The phone took a good 5 minutes to reboot, but when it did, Google Play was there! I logged into the Play store and installed the Exodus Privacy app to test it was working. It was. Yay!
Conclusion
I couldn’t be happier with how this has all worked out. I’ve resurrected an old device to run an up-to-date version of Android and in the process have reduced Google’s ability to track me more than it already does. Here’s what the new OS looks like:
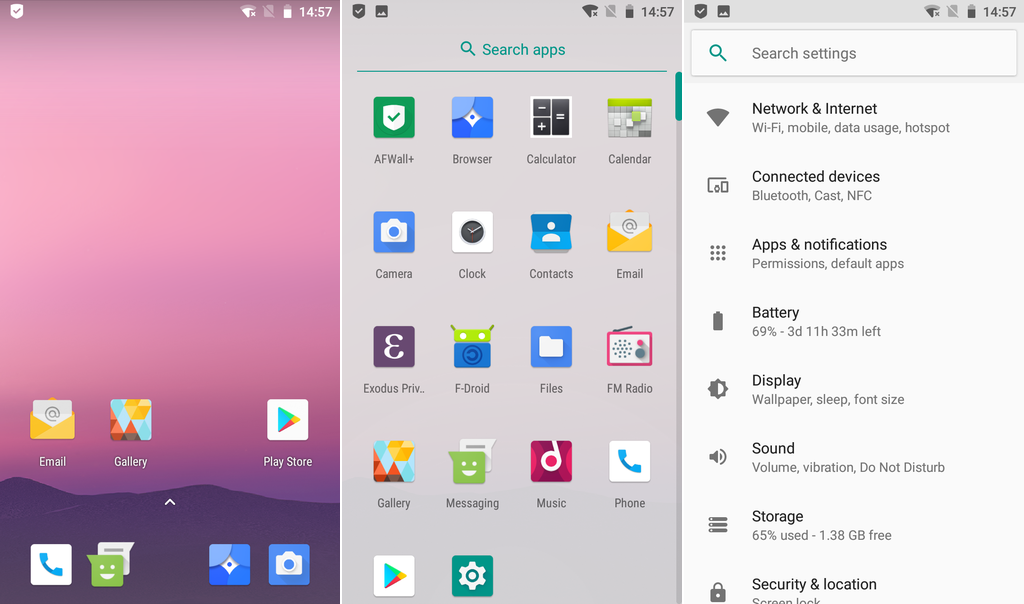
This post has been a bit rambling and in places more of a “note to future self”. Nonetheless I hope it has helps anyone looking to get started with flashing their Android with a custom ROM. I’d be happy to hear what you though in the comments below.
Comments